 |
| Crochet Granny Square Lap Blanket in Dallas Cowboy Colors |
This past spring my husband, and I along with his parents took a trip to visit his grandfather who we affectionately call Paw Paw. He is a lively man who will tell you all kinds of jokes, tell you stories about his Cajun living in Louisiana, and even show you a magic trick.
While visiting Paw Paw we noticed his small apartment had outdated pictures of my husband and I so I made a mental note to print and mail him updated pictures. We also noted his picture of Pope Benedict need to be replaced with a current one of Pope Francis - I also made a metal note to find him an updated one since I work in a Catholic school after all.
Then while Paw Paw was teaching my husband how to cook a nice shrimp etouffee he commented that he had trouble finding the Cajun seasonings he like. In made a final mental note, that since we were close to Louisiana than Paw Paw that I would make sure to grab some of his favorite Cajun seasonings ... that is along with printing updated family pictures, and a picture of Pope Francis.
Lo and behold I had a care package building to send Paw Paw!
However, the items seemed small, and I felt like one more personal item was needed. What can I add to his care package? He loves the Dallas Cowboys, but I never found anything I liked. So what should I send him? Of course! I could crochet something for him!
My struggle was I didn't want a blanket that would take a lot of time (most take about three months) and having worked with granny square rounds I knew they went quick. So I started with that idea - a granny square motif, but not individual granny squares because sewing them together can take a while as well.
During my search I found this lap blanket that inspired me: http://www.redheart.com/free-patterns/crochet-granny-blues-lapghan
Better yet, the colors inspired me to crochet the blanket using the colors of his beloved football team the Dallas Cowboys. Now say what you want about the Dallas Cowboys, but Paw Paw is a huge fan and I will not argue with an old man. So off to Joann's I went to pick out the yarn and then sat down to figure out how I wanted to do the pattern to my liking.
 |
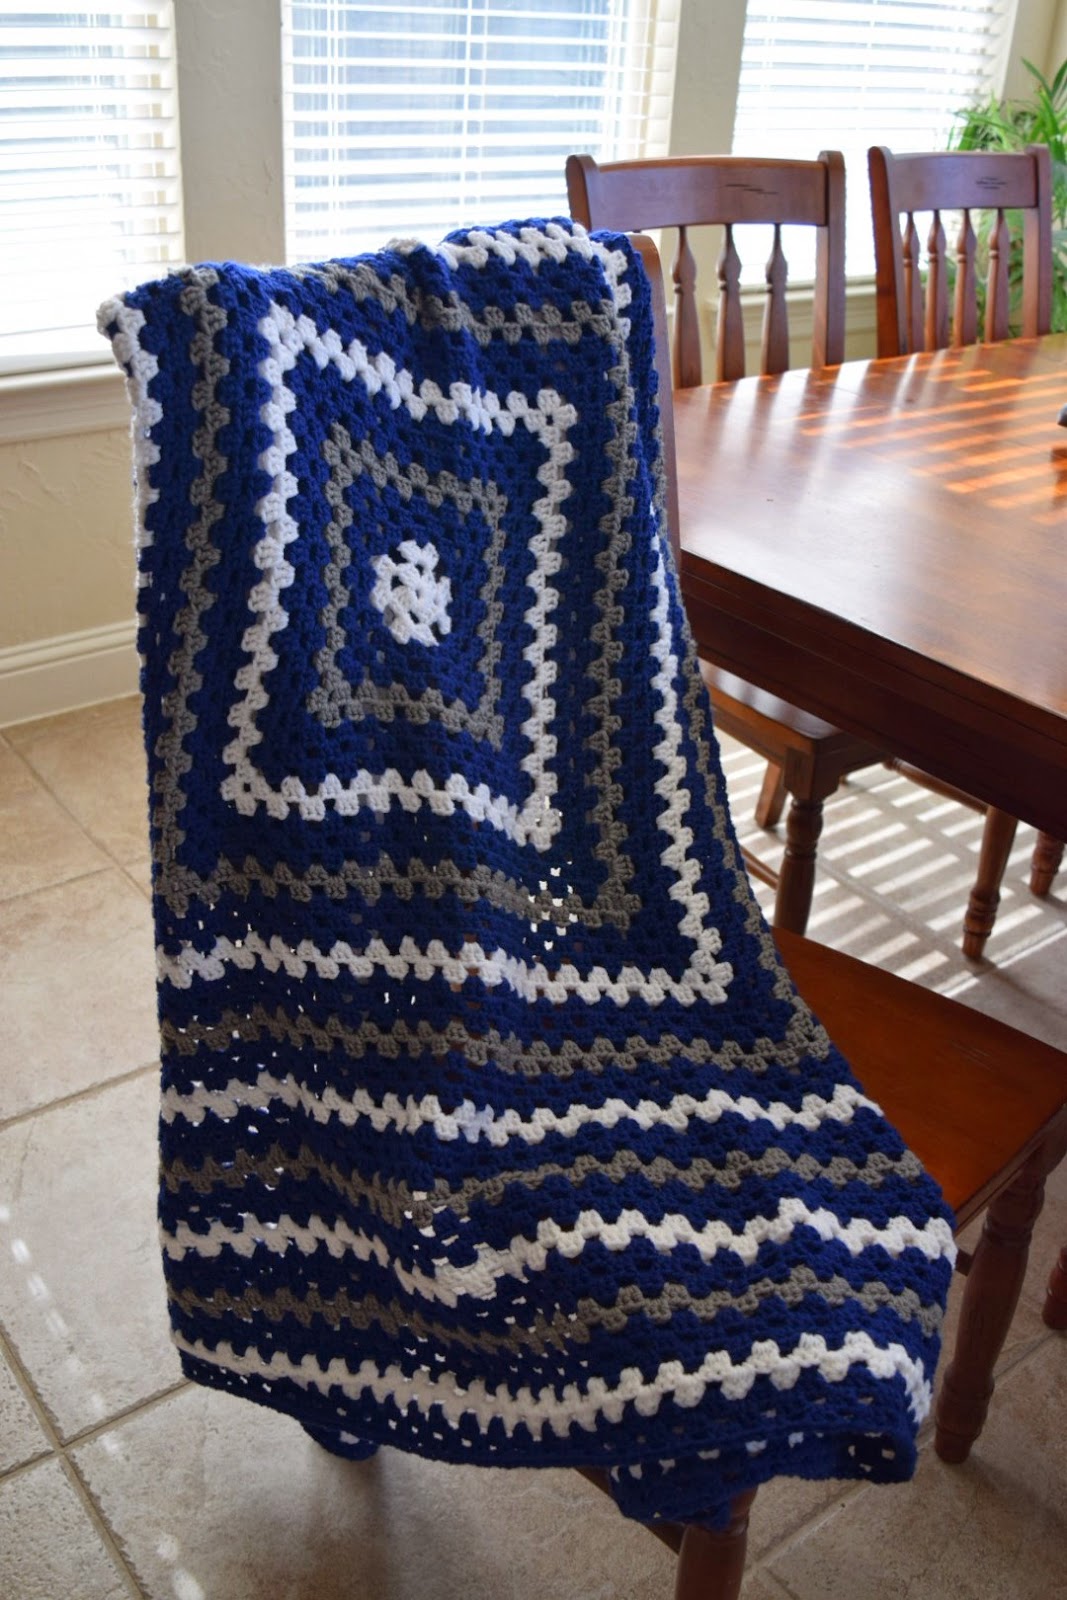
| The finished product with a few modifications to the original pattern. |
Here are the modifications and specifics of how I did this lap blanket.
Crochet Granny Square Lap Blanket in Dallas Cowboys Colors Free Pattern Written Out for Beginners
Yarn:
Red Heart with Love in White (Color A) and I used about 3 skeins for this project
Red Heart with Love in Navy (Color B) and I think I used about 5 to 6 skeins.
Red Heart with Love in Pewter (Color C) and again about 3 skeins.
**Note: The pewter color is a smooth grey (not "heathered") and makes for a great accent color since this is one of the Cowboy's accent colors along with the white. This additional color really makes the piece say "Dallas Cowboys!"
Here pictures of the colors close up to give you an idea:


Other Materials:
Crochet hook size I-9/5.50mm
Yarn Needle to sew in the tails
Read Red Heart's pattern to get started because the first few rounds are a little different. The over all pattern though is to do three double crochet clusters with a chain between them with three chains acting as the corner. What I love about this pattern is how easy it is to figure out - perfect for beginners - because you don't have to go into stitches, you just crochet into empty spots. The advantage of this is if you drop a stitch (like I did a few times) it does not ruin your project.
 |
| Close up to show you the clusters. |
I've written out the pattern here for those of you who are not good at reading patterns as I was when I first started - the language is foreign! I even put in links to about.com's website tutorials. If these tutorials don't work for you just keep on googling till you find pictures or videos that work.
Pattern:
Take your first color (color A), in my case this was white and make your slip knot. This does not count as your first stitch. Next chain five and then slip stitch into the first chain to make a ring.
Round 1:
- Now you are going to start your first round and you will do this by crocheting your stitches into the ring you just made. The tail might get in the way so just watch what yarn you are working with - we'll deal with the tail later. For this round, hold your circle and chain three. This is going to count at your first double crochet "into" the ring. A chain three is about the same height at a double crochet which is what you are going to do next.
- Now that you have your chain three, double crochet two times into the empty space of the ring (note you are not crocheting into any stitches, you are crocheting into the empty space of the ring. After you have done this you should have a chain three stitch right next to your two double crochets - a nice cluster!
- Ready for the next step? Now chain three again. The purpose of this chain three is to act as the first corner of your square - this will be important later.
- Next double crochet three more times into the ring. If it's getting crowded in the ring, it's ok!
- Again chain three to make the second corner of your square.
- Double crochet three more times into the ring.
- Chain three to make the third corner of your square.
- Double crochet three more times into the ring.
- Chain three to make the fourth and last corner of your square.
- Let's finish off this square and you'll do this by joining your chain three into the first double crochet with a slip stitch.
- You should have four clusters with four chain three spaces. Any time you make a corner (or chain three space) this will be used in the next round.
- Note: do not flip your work! One of the unique things about rounds is you always work with one side and do not turn your work like you would if you were working in rows. This is rounds meaning you go around and around as you work.
- Let's start the next round, still with white (color A), slip stitch in to the next double crochet and into the first corner - what you are doing here is "moving" your stitch through the double crochets so that we can get our hook to the corner. You're not really creating stitches, you're just moving your yarn along the row.
- Once you have your slip stitch in the first corner, chain three like you did after you made the ring in the first round.
- Double crochet two times into the corner.
- Like the previous round, you will chain three to create a corner (this is the corner we will use for the next round) then double crochet into the same corner (chain three space) you just used in the previous step. The purpose of this is to create a corner for this round - still with me?
- I'm about to throw you for a loop, pun intended, you will just chain one now. You are creating the side of your square. Anytime you chain one that is a side, a chain three is a corner.
- After the chain one you will double crochet three times in the next corner (or chain three) space.
- Chain three to create a corner for the next round.
- Then double crochet three times into the same corner (or chain three) space. You just created two corners and a side to your square.
- Next chain one, to creating a side to your square.
- Double crochet three times into the next corner (or chain three) space, chain three to create a corner for the next round, and double crochet three times into the same corner.
- Chain one and join with a slip stitch into the first double crochet like you did the previous round.
The rounds repeat like this and follow your typical granny square pattern so if you're still having trouble with it I recommend looking online on how to do a granny square. They're easy and forgiving to mistakes you may make.
Essentially you are adding one cluster of double crochet to each side with each round. Keep in mind this pattern makes a square, not a rectangle.
The overall pattern for the colors is as follows:
Round 1 - 2: Color A White
Round 3 - 6: Color B Navy
Round 7 - 8: Color C Pewter
Round 9 - 10: Color A White
Round 11 - 13: Color B Navy
Round 14 - 15: Color C Pewter
Etc...
This pattern continues and I did a total of 55 rows, but Paw Paw is a tall man so I wanted to make sure it covered him well. I could use it as a blanket, but I'm short! The Red Heart pattern calls for 34 rounds which would be a nice sized lap blanket for someone like me.
It's an easy blanket to make and I know that Paw Paw will love having a Cowboy's themed blanket while he watches his football games and John Wayne movies in the comfort of his recliner.
Leave me comments if there are any questions or concerns!
 |
| Crochet Granny Square Lap Blanket in Dallas Cowboys Colors |