Showing posts with label free crochet pattern. Show all posts

Friday, August 15, 2014

Fall Leaves Crochet Earrings

Adorable Maple Leaf Crochet Earrings!

This past weekend I picked up some new hooks at JoAnn's to mix things up a bit. I have big hooks, medium sized hooks, but I wanted to try out the tiny hooks! Brave. I know. I also picked up some thread to try out.

I found this pretty thread and instantly thought "fall!" What is a symbol of fall? Leaves! And since our recent visit to Canada I thought that a maple leaf might be a good choice of leaf to start with.

After a little "research" (Pinterest/Google images) I found this free pattern that is made with just regular yarn. I gave it a go and found the pattern very easy to follow and to make. I also copied and paste it below for reference.

After making one of these little guys, I couldn't resist and made a few more. Then the inspiration hit me to turn them into earrings. I use to dabble a little in jewelry making and beading so I found my old supplies and got to work!

Here's is what resulted:

Maple Leaf Earrings!

This picture gives you an idea of how small they ended up.


Maple Leaf Pattern:

Colorful Maple Leaves worsted weight yarn ***(I used Lisbeth thread size 20)
hook 4mm ***(I used a size 1.5mm hook or size 7)
optionally one split ring stitch markers

st, sts-stitch, stitches
sp, sps-space, spaces
ch-chain
sl st-slip stitch
sc-single crochet
dc-double crochet
tr-treble crochet
picot-chain 3, sl st in back bump of 3rd ch from hook


Base ring:
ch7, join with sl st to form circle

Round 1
ch1 (doesn't count as sc), 15 sc around, join with sl st in first sc, put marker in st just made, do not turn
Round 2
ch2, dc in next st, ch2, sl st in each of next 2 sts,
*ch3, tr in next st, ch3, sl st in each of next two sts* 3 times
ch2, dc in next st, ch2, sl st in next st
Steam

ch 10, starting in 4th ch from hook sl st in back bump of each ch  across , sl st in marked st (remove marker)
Round 3
2sc in next ch2 sp, sc in next dc, picot, sc in next ch2 sp
3sc in next ch3 sp, sc in next tr, picot, 3sc in next ch3 sp
4sc in next ch3 sp, sc in next tr, picot, 3sc in next ch3 sp
3sc in next ch3 sp, sc in next tr, picot, 3sc in next ch3 sp
2sc in next ch2 sp, sc in next dc, picot, 2sc in next ch2 sp
sl st in last st before steam
Pattern Source.

Tuesday, August 12, 2014

Chrochet Braided Infinity Scarf - Free Pattern

Crochet Braided Infinity Scarf - Free Pattern Below!
I have a sick obsession with my Pinterest boards. It's like what Reddit is for my husband, but mine is actually productive (oops! did I say that?!). But I, like so many other people on Pinterest, pin amazing things that I may never do, but hope to some day. Most Saturadays or lazy mornings I can be found in bed, with a cup of coffee or tea, and my iPad open to Pinterest just pinning away - usually an episode of Pioneer Woman on TV to further my pinning. 

So one of the things I have pinned on my Pinterest crochet board (http://www.pinterest.com/allisonsavoy/) was a braided infinity scarf - supper pretty and instantly pinnable.  If you haven't seen one search for it on Pinterest. They would make a stylish gift for any lovely lady you know ... like yourself!

Seriously.
This weekend I organized and inventoried my yarn stash because JoAnn's was have a sale this weekend I couldn't miss - not that you should miss any good sale, but this was the holy grail of sales combined with coupons.  And much to my hubby's dismay I wanted to load up on yarn for the fall.  So as I was going through my yarn stash and found some Bernat yarn that I had scored on sale at JoAnn's a while back - no joke it was $0.97 per skein. Sorry, Macklemore, I did NOT need to go thrift store shopping because JoAnn's knows how to mark 'em down!

If only every trip to JoAnn's began this way...
It is Bernat Mosaic in the shade called Aura (http://www.ravelry.com/yarns/library/bernat-mosaic) - I thought it was really pretty (and so soft which are two criteria for any yarn unless it is for someone you don't like), but at the time I purchased it just didn't have the right project for it which is the case for most yarn we purchase.  We go "oooo pretty! I'll find a project for you ... later." Then go back to Pinterest ... I diverge....


Some goes for yarn. If you get cheap yarn then you know how I feel about you...
Well, as I was basking in the glory my reunion with the Mosaic yarn an idea took hold - this yard would be perfect for the braided scarf I want to make! Pinterest inspiration is born! Doncha love it when that happens? Some people are pinner to their boards and other create from them -- guess which we are?!

So pretty! What a lovely discovery in my yarn collection!
I did a little research (Pinterest) and settled on writing my own pattern that worked for me and what I wanted to achieve which was awesomeness. But awesomeness has to be carefully crafted by taking the best ideas you can find through your research. At least that is what grad school taught me. 

Lucky you can skip all that research and pinning -- ok just the research -- because I have written the pattern out below along with some tips and tricks because someone has to learn from my mistakes. I don't claim to know it *all* for this pattern - despite my amazing research. So please feel free to leave a comment if you have a suggestion of how to improve the pattern just make sure you use your indoor voice.

Difficulty: Easy ... and you're thinking "ok what does she REALLY mean?" It is easy if you have done a few pieces and feel comfortable with crochet. Not a beginners piece, but if you're good at this you'll get it done in no time bar the sewing to make it an infinity scarf.

Materials:
Yarn: I used the Bernat Mosaic in Aura which is a medium weight yarn. If you go with a bulkier weight yarn you will need to make a smaller foundation chain so just keep that in mind (about 50 inches is what I would aim for on average). I used two skeins of the Bernat Mosaic which is 209 yards (191 meters) each so a total of 418 yards (382 meters) - always buy more than you need ... as if I had to tell you that. I had yarn left over (yes!) so it'll give you plenty of medium weight yarn.
Hook: This yarn called for a size H or 5.00mm hook
Yarn needles, clothes pins.

Stitches:
The only stitch you need to know for this pattern is a double crochet. You can sub out any stitch you'd like though (half double, single, triple, back post stitch, etc.).

**Variation idea: (this is just bonus) If you go with a bulkier yarn then I would do a back post stitch-like pattern to give it a knit look. Might come off looking very Katniss-like from Catching Fire. You can see what this looks like in my blog about this stitch that I used on a blanket.(http://chateaudesavoy.blogspot.com/2014/06/chunky-back-post-stitch-masculine.html)

Other tips about this pattern:
The basics of this pattern is you are making three mini scarves then braid them together, but the scarves are not made quite like you'd think. The foundation chain will represent the length of the scarf then you add about 5 rows to create the width of the scarf. Different because I know most scarves I make a small foundation chain to represent my width then just keep on adding rows till I get the desired length. Nope! This different technique give the scarf a different, but awesome, look.

To start, chain 200 which gives your first mini scarf a length of about 50 inches. Again, chain less if you want a shorter scarf and chain more if you want it longer. At the bottom is a picture of myself to give you perspective - I'm about 5'2" if that helps.

Ok, it was really 51" but you don't need to be exact! And guess what? My foundation chain is not near as pretty as those pictures from the pros - feel better now doncha?
 Rows 1: On your foundation chain, chain another two and then double crochet into the second chain from the hook - you will do 200 double crochets, chain two, then turn. Now as you do this you may noticed that your double crochets are curling up (see below) - there are a few ways to prevent this. First crochet your foundation chain very loosely you high anxiety person! Another technique that've been known to employ is to use a bigger hook like one letter up (in this case an I or even a J if you're a REALLY tight crocheter). Now I did a loose foundation chain and this still happened, but it disappeared the further I got - so just keep on going and if it doesn't look good you can always rip it out! There are many projects that don't really start to take shape until I get a few rows or rounds in.


Just make a loose foundation chain and the curl won't stick around after a few rows

Rows 2 - 5: Repeat the same thing you did in row 1. And don't forget to turn in a good TV show or movie you can listen to while crochet. I recommend a good BBC Masterpiece miniseries to make you feel sophisticated, but that's really up to you!
Row 6: This step is optional, I didn't like how the foundation chain left the scarf looking unbalanced (something that always bothers me when I finish a project) so I did one last row of slip stitches all the way across before fastening off.

Here's what my first scarf looked like:

One down two more to go!!
Do this entire pattern two more times to get three mini scarves. What you have might look like this:

I love how they are all different even though my OCD/perfectionist side is twitching a bit.
Now comes the tricky part - putting it all together. I'll share with you what I did and what I would improve - take what you want from it! First I sewed in all the tails on the scarves.

Lay your scarves out on a flat surface and figure out what order you want them in - if it's all one color this may not make a difference, but when we make out projects WE know the difference between the scarves because WE made them. Before I started braiding them I realized it might be a good idea to connected all of them together (picture below) - looking back on this you probably don't HAVE to, but it seemed like a good idea at the time. So across the top I did a single crochet. Hindsight, I might do a double crochet so it's a little more sturdy easier to connect to make the infinity part of the scarf, but I didn't want a huge seam so I went with a single crochet. Heck, you could even do a slip stitch! Again, connected them across the top is optional, but I thought it would keep everything together -- including my sanity!

Optional, but may help your sanity - especially if you are not coordinated like me - connecting them across the top with a single crochet before you start braiding them.
After connecting them, you can fasten it off. I didn't do that right away because I'm great at second guessing myself -- I mean I wanted to make sure that I kept the yarn attached incase I wanted to use it for connected the opposite ends of the scarves.

Next, I took something heavy - I had a Panini press! (my husband thought I was nuts, but hey, he married me!).  The Panini press (which was clean!) was used to hold down the connected scarves while I braided them. Again, optional, but it helped me and my uncoordinated ways.

Weight it down and start braiding! It's like I'm combining my two favorite hobbies - crochet and cooking - but I'm not gaining any calories!
I wasn't too tight with braiding them, and it takes a while to find how tight you want it. If you're a perfectionist this will drive you up the wall and you'll probably redo it ten times. Seriously. I was able to restrain myself to just five tries. Looking back I might try to braid a little tighter, but the tighter I did it I noticed the more the individual scarves start to curl. Don't fret over it too much - after all this is a hobby that should make you relaxed and happy!

Happy little scarves being braided. I braided loosely and tried not to re-do it too much!
But once you get the braiding looking the way you want it try to make the ends of the braid all line up.

Get the to line up as best you can. It's ok if one is longer or shorter than the other because once you sew the opposite ends together ... no one will ever know! Crochet is so forgiving!
Next, I used some clothes pins I had on hand to keep the braid together while I flipped it up to where my Panini press is holding down the other end. Because if that braid came undone I was going to come undone as well - I had it just the way I wanted it!

I pinned it (literally - not on Pinterest!) together so that it wouldn't come undone.
Now, take your project (you can have a seat and resume watching your BBC Masterpiece miniseries) and carefully sew the ends together using your yarn needle and about a foot or so of yarn of the same color. Make sure your yarn is not attached to the skein. Again, hindsight I might have kept the yarn attached at the top where I made the single crochet so I could just use that to sew the opposite ends together. Options! Options!

My first go and sewing these together - I'd probably do it a little differently next time. Just use your yarn needle to sew in and out of the stitches.
I'll be honest and say I just took my yarn needle and sewed both ends together by weaving my needle with yarn in and out of the ends of the scarves. However, I recommend taking your clothes pinned end and matching them up to make another braid. Here's what I mean, looking at the picture below, I would have taken the top left scarf and matched it up to the bottom right scarf and so on so that it created one more braid to be sewn together. You can do it my way, but you definitely have a seam that you'll want to hide with your hair. --Like I said! I'm perfecting this! If you have a better way of doing this PLEASE SHARE! Sharing is caring!

Sew the ends into the single crochet row. I probably would have sewn the ends together differently now so that it looked like one more braid - live and learn!
Guess what? You're done! That's it! Aside from getting the scarves braided and sewn together this is a super easy project that only mildly tests your sanity. So what's next? Make another one using a different stitch or a different type of yarn! Use multiple colors! Do five small scarves instead of three bigger ones! The possibilities are endless!! And if you needed a stylish gift for "that" friend/family member who is always changing their wardrobe - they'll love this! Or maybe that's you!

Pretty! Pretty!
I wish you luck and leave questions or suggestions in the comments. Thanks!

Crochet designer and model! Just kidding, but why not show off my beautiful creation?! Happy crocheting!
 

Thursday, August 7, 2014

Fall Perfectly Pumpkin Crochet Basket - Free Pattern

Perfectly Pumpkin Fall Basket
My mother was in town recently and we took are usual pilgrimage to JoAnn's to oogle over yarn. I have her to blame for my crochet hobby and subsequent yarn addition. Lucky for us JoAnn's was have a clearance sale on some of their yarn! Many things had been picked over, but I was able to get five skeins of pumpkin colored yarn which gave way to a Fall inspiration.

This summer I learned how to crochet a basket which has been handy -- I made two! But I realized when making the baskets it would be really fun to make one to hold Halloween candy this Fall. It seems like every Halloween I buy tons of candy, but never really have a good candy bowl with which to distribute the candy. So why not make one?!


When I saw the pumpkin colored yarn I knew I had to have it - and it was 50% off the original price!  (All said and done this basket cost me under $10.) Now there is a difference with this yarn than others I used to make baskets: it's the bulky yarn. This particular yarn is Wool Ease Chunky by Lion Brand. It yielded a color hard to photograph, but a very nice basket!

After making the basket I was going to use black yarn and stitch a Halloween pumpkin face on it, but the more I thought about it the cheesier it was looking in my mind. So why not a little embellishment? So I made a leaf and corkscrew which almost looks like a pinecone!

I have written out the pattern along with the little embellishments I made for it below.

Apples! In a pumpkin basket! Cute!


Fall Perfectly Pumpkin Crochet Basket
Yarn: A chunky pumpkin colored yarn - 2 skeins will do. I used Lion Brand Yarn Wool-Ease Chunky yarn in Pumpkin.
You will also need a little bit of green and brown for the embellishments. I had scrap yarn on hand so I just used what I had.
Hook: The hook it calls for is a K or a 6.50mm, but to make the basket you want a tight stitch so I went down to an I or 5.50mm hook.
Pattern notes: So not only are you going with a smaller hook, but you are also going to hold two strands at once. It can be tiresome on the hands, but using two strands is what makes it stiff. Yes, you are decreasing your hook size AND using two strands at once - this will yield a sturdy basket, but it can be troublesome on the hands. Take breaks! Here's a picture of what I mean you have to use two strands at once:


Working with two stands means two skeins as well!
Pattern:To begin chain four, and then make a ring by slip stitching into the first chain you made. Chain three (this does not count as a double crochet).
Round 1: In the ring you made do ten double crochets. When you've made the last double crochet, slip stitch into the top of the first double crochet for that round. This technique will make a nearly invisible seam. Chain three to start the next row.
Round 2: Do two double crochets into the same stitch as the chain three, then do two double crochets into every stitch after that. You should now have twenty double crochets. Slip stitch into the top of the first double crochet. Chain three and now begins a new "rhythm" to the pattern.
Round 3: Do two double crochets in the same stitch as the chain three, one double crochet in the next stitch, two double crochets in the third, one double crochets in the fourth, two double crochets in the fifth, etc. Repeat this process all the way around, you should now have thirty stitches. Slip stitch into the top of the first double crochet. Chain three.
Round 4: Two double crochets in the same stitch as the chain three, one double crochet in each of the next two stitches, two double crochets in the next stitch, one double crochet in each of the next two stitches, etc. Repeat till all the way around. Slip stitch into the top of the first double crochet. Chain three.
Round 5: Two double crochets in the same stitch as the chain three, one double crochet in each of the next three stitches, two double crochets in the next stitch, one double crochet in each of the next three stitches, etc. Repeat till all the way around. Slip stitch into the top of the first double crochet. Chain three.
Round 6: Two double crochets in the same stitch as the chain three, one double crochet in each of the next four stitches, two double crochets in the next stitch, one double crochet in each of the next four stitches, etc. Repeat till all the way around. Slip stitch into the top of the first double crochet. Chain three.
Round 7: Two double crochets in the same stitch as the chain three, one double crochet in each of the next five stitches, two double crochets in the next stitch, one double crochet in each of the next five stitches, etc. Repeat till all the way around. Slip stitch into the top of the first double crochet. Chain three.
Round 8: Now you are finished making the bottom of your basket and it's time to make the sides. The stitch you are going to do is called a back post stitch where you actually crochet around the post of a double crochet. Here is a link to a tutorial on how to do this. It's a really neat stitch actually! If that tutorial doesn't work just search for double crochet back post stitch. Back to the pattern! Do a double crochet back post stitch in the same stitch as the chain two, then do the double crochet back post stitch all the way around. You hand might get tired! Once you've gone all the way around slip stitch into the top of first double crochet and chain three.
Round 9-12: From here on out the usual double crochet in each stitch with continue along with slip stitching into the top of the first double crochet and chaining three. You will do this for the next four rounds before it'll get interesting. And if your basket doesn't look quite right just give it a few rounds to take shape.
Round 13: This round we will create the handles. To do this do a double crochet in the next thirteen stitches, then skip the next nine stitches and instead chain eleven (this is the beginning of your handle). After skipping nine stitches do a double crochet in the next twenty six stitches. Here is the next handle, skip nine stitches and chain eleven. To finish off the round do a double crochet in the next thirteen stitches, slip stitch into the top of the first double crochet and chain three.
Round 14: Last round! Double crochet into each stitch include the chain eleven from the previous round. This will create good sturdy handles.

Here's a close up of the handles:


Embellishments:
Like I said earlier I debated putting a cute Halloween face on the basket, but I instead decided a little green leaf and corkscrew might look nice. Here are the patterns. Before you do any of these though I'd like to recommend to keep a long tail so that you have something to sew with when you attach to the basket.
Leaf:
Chain 14. In the second chain from the hook do one single crochet, in the next stitch do a half double crochet, then in the next three stitches do a double crochet in each. Then in the next three stitches do a triple crochet in each. Next you will reflect what you just did. Double crochet in the next three stitches, half double crochet in the next stitch and single crochet in the last.
Then you will chain three to make a bit of a stem. Slip stitch in to the third single crochet from your hook - this makes the tip of the leaf.
You just made one side of the leaf with the foundation chain representing the middle of the leaf. For the next part you will make the other half of the leaf which is a reflection of what you just did.
So working into the other side of your foundation chain single crochet in the first stitch of the chain, double crochet into the next one, then one double crochet in the next three stitches, triple crochet in the next three stitches, double crochet in the next three stitches, half double crochet in the next stitch, and then finally a single crochet in the last stitch. Fasten off and you have your leaf.
Corkscrew:
These are super easy! Just chain however long you want it to be - I did 25 because it seemed like a nice number. Then do two double crochet into the fourth chain from the hook. Then in every chain after that do three double crochets till you reach the end. Leave this tail long do you can use it to sew into the basket.
Sewing on the embellishments:
I used the long tails from the stem of the leaf and the corkscrew with a yarn needle to connect them to each other and then connected it to the basket. The leaf kept on rolling up on me so I took another strand of the green and sewed through the middle of the leaf onto the basket so it would hold. There's really no right or wrong way to do all this, just experiment and know that you can always rip it out if it doesn't work.

Here's a close up of the embellishments. I tried to rotate the photo, but technology is not being my friend.


Leaf and corkscrew. The green color did not photograph well, but I promise you it's a pretty color!
Now you should have a lovely fall basket! What shall you use it for? A centerpiece for fruit on your dining room table? A festive catch-all for the season? Fill it with pinecones, pumpkins, and other seasonal goodies? Or Halloween candy like I will?! The possibilities are endless!

If you have any questions just let them in the comments!


Friday, July 11, 2014

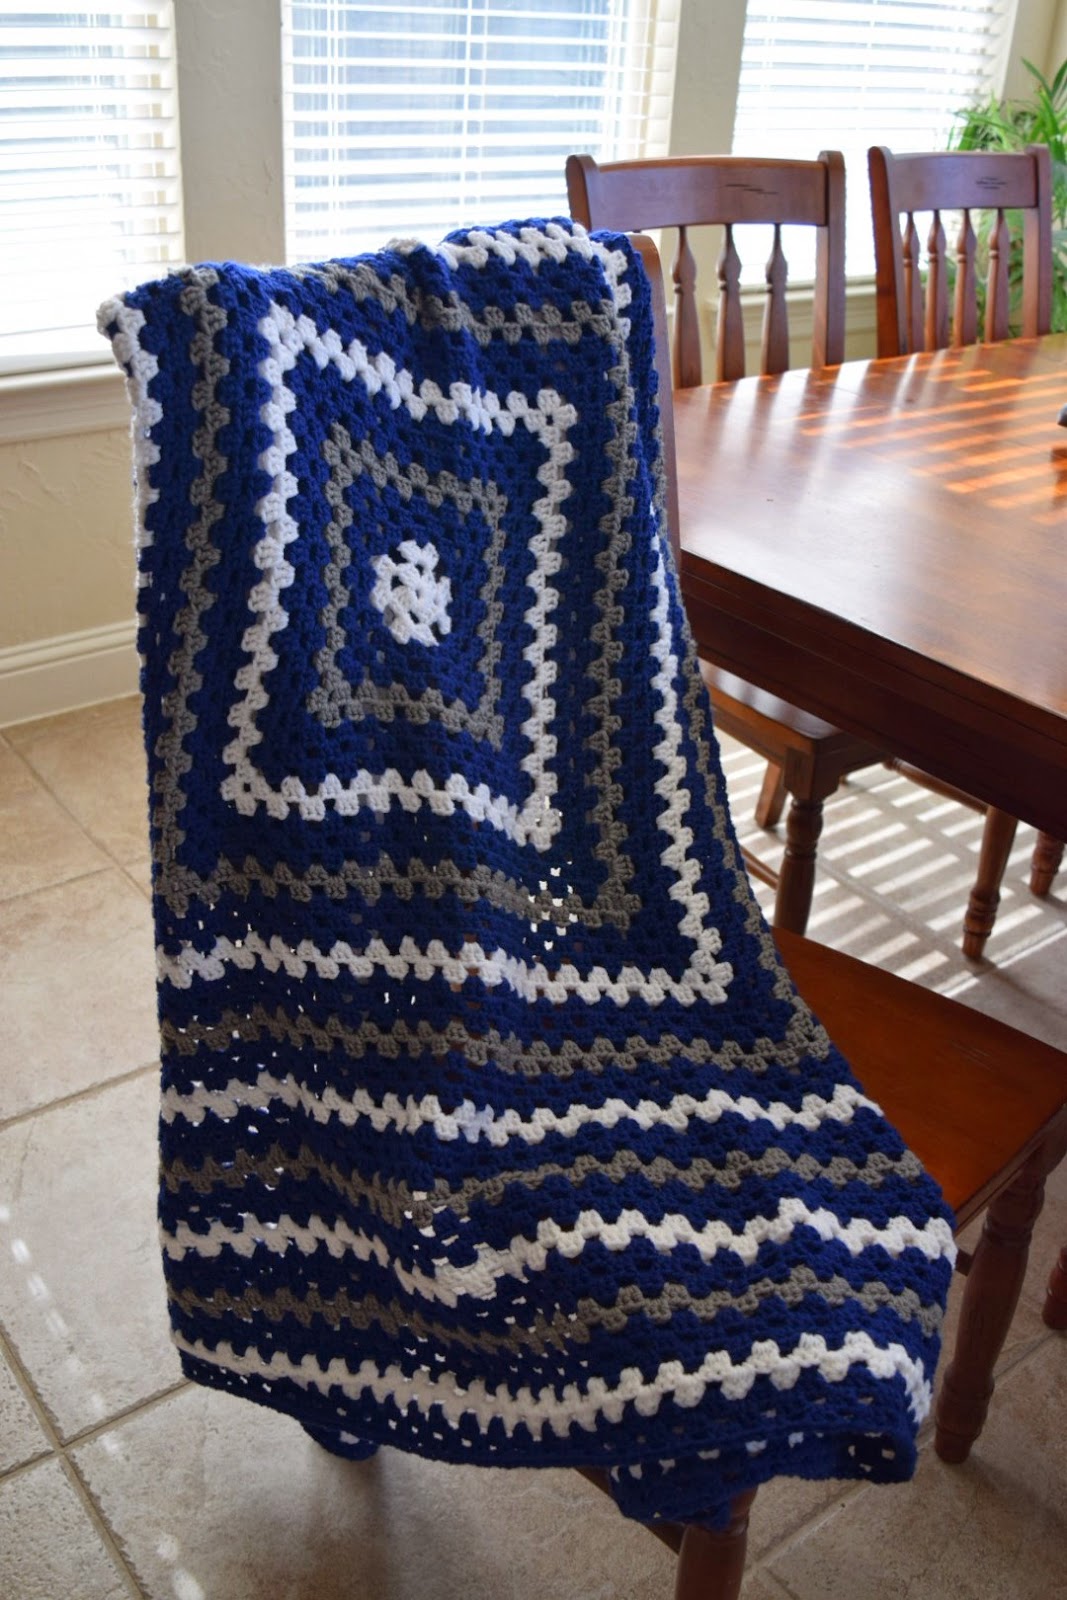
Crochet Granny Square Lap Blanket in Dallas Cowboys Colors Free Pattern Written Out for Beginners

Crochet Granny Square Lap Blanket in Dallas Cowboy Colors

This past spring my husband, and I along with his parents took a trip to visit his grandfather who we affectionately call Paw Paw.  He is a lively man who will tell you all kinds of jokes, tell you stories about his Cajun living in Louisiana, and even show you a magic trick.

While visiting Paw Paw we noticed his small apartment had outdated pictures of my husband and I so I made a mental note to print and mail him updated pictures. We also noted his picture of Pope Benedict need to be replaced with a current one of Pope Francis - I also made a metal note to find him an updated one since I work in a Catholic school after all.

Then while Paw Paw was teaching my husband how to cook a nice shrimp etouffee he commented that he had trouble finding the Cajun seasonings he like. In made a final mental note, that since we were close to Louisiana than Paw Paw that I would make sure to grab some of his favorite Cajun seasonings ... that is along with printing updated family pictures, and a picture of Pope Francis.

Lo and behold I had a care package building to send Paw Paw!

However, the items seemed small, and I felt like one more personal item was needed. What can I add to his care package? He loves the Dallas Cowboys, but I never found anything I liked. So what should I send him? Of course! I could crochet something for him!

My struggle was I didn't want a blanket that would take a lot of time (most take about three months) and having worked with granny square rounds I knew they went quick. So I started with that idea - a granny square motif, but not individual granny squares because sewing them together can take a while as well.

During my search I found this lap blanket that inspired me: http://www.redheart.com/free-patterns/crochet-granny-blues-lapghan 

Better yet, the colors inspired me to crochet the blanket using the colors of his beloved football team the Dallas Cowboys. Now say what you want about the Dallas Cowboys, but Paw Paw is a huge fan and I will not argue with an old man. So off to Joann's I went to pick out the yarn and then sat down to figure out how I wanted to do the pattern to my liking.

The finished product with a few modifications to the original pattern.
The pattern PDF can be found by either clicking the link above or this link right here.

Here are the modifications and specifics of how I did this lap blanket.

Crochet Granny Square Lap Blanket in Dallas Cowboys Colors Free Pattern Written Out for Beginners

Yarn:
Red Heart with Love in White (Color A) and I used about 3 skeins for this project
Red Heart with Love in Navy (Color B) and I think I used about 5 to 6 skeins.
Red Heart with Love in Pewter (Color C) and again about 3 skeins.
**Note: The pewter color is a smooth grey (not "heathered") and makes for a great accent color since this is one of the Cowboy's accent colors along with the white. This additional color really makes the piece say "Dallas Cowboys!"
Here pictures of the colors close up to give you an idea:


Other Materials:
Crochet hook size I-9/5.50mm
Yarn Needle to sew in the tails

Read Red Heart's pattern to get started because the first few rounds are a little different. The over all pattern though is to do three double crochet clusters with a chain between them with three chains acting as the corner. What I love about this pattern is how easy it is to figure out - perfect for beginners - because you don't have to go into stitches, you just crochet into empty spots. The advantage of this is if you drop a stitch (like I did a few times) it does not ruin your project.

Close up to show you the clusters.
Can't read traditional patterns?
I've written out the pattern here for those of you who are not good at reading patterns as I was when I first started - the language is foreign! I even put in links to about.com's website tutorials. If these tutorials don't work for you just keep on googling till you find pictures or videos that work.

Pattern:
Take your first color (color A), in my case this was white and make your slip knot. This does not count as your first stitch. Next chain five and then slip stitch into the first chain to make a ring.

Round 1:

  • Now you are going to start your first round and you will do this by crocheting your stitches into the ring you just made. The tail might get in the way so just watch what yarn you are working with - we'll deal with the tail later. For this round, hold your circle and chain three. This is going to count at your first double crochet "into" the ring. A chain three is about the same height at a double crochet which is what you are going to do next. 
  • Now that you have your chain three, double crochet two times into the empty space of the ring (note you are not crocheting into any stitches, you are crocheting into the empty space of the ring. After you have done this you should have a chain three stitch right next to your two double crochets - a nice cluster!
  • Ready for the next step? Now chain three again. The purpose of this chain three is to act as the first corner of your square - this will be important later. 
  • Next double crochet three more times into the ring. If it's getting crowded in the ring, it's ok! 
  • Again chain three to make the second corner of your square. 
  • Double crochet three more times into the ring.
  • Chain three to make the third corner of your square.
  • Double crochet three more times into the ring.
  • Chain three to make the fourth and last corner of your square.
  • Let's finish off this square and you'll do this by joining your chain three into the first double crochet with a slip stitch.
  • You should have four clusters with four chain three spaces.  Any time you make a corner (or chain three space) this will be used in the next round.
  • Note: do not flip your work! One of the unique things about rounds is you always work with one side and do not turn your work like you would if you were working in rows. This is rounds meaning you go around and around as you work.
Round 2

  • Let's start the next round, still with white (color A), slip stitch in to the next double crochet and into the first corner - what you are doing here is "moving" your stitch through the double crochets so that we can get our hook to the corner. You're not really creating stitches, you're just moving your yarn along the row.
  • Once you have your slip stitch in the first corner, chain three like you did after you made the ring in the first round. 
  • Double crochet two times into the corner.
  • Like the previous round, you will chain three to create a corner (this is the corner we will use for the next round) then double crochet into the same corner (chain three space) you just used in the previous step. The purpose of this is to create a corner for this round - still with me?
  • I'm about to throw you for a loop, pun intended, you will just chain one now. You are creating the side of your square. Anytime you chain one that is a side, a chain three is a corner.
  • After the chain one you will double crochet three times in the next corner (or chain three) space.
  • Chain three to create a corner for the next round.
  • Then double crochet three times into the same corner (or chain three) space. You just created two corners and a side to your square.
  • Next chain one, to creating a side to your square.
  • Double crochet three times into the next corner (or chain three) space, chain three to create a corner for the next round, and double crochet three times into the same corner.
  • Chain one and join with a slip stitch into the first double crochet like you did the previous round.

The rounds repeat like this and follow your typical granny square pattern so if you're still having trouble with it I recommend looking online on how to do a granny square. They're easy and forgiving to mistakes you may make.

Essentially you are adding one cluster of double crochet to each side with each round. Keep in mind this pattern makes a square, not a rectangle.

The overall pattern for the colors is as follows:

Round 1 - 2: Color A White
Round 3 - 6: Color B Navy
Round 7 - 8: Color C Pewter
Round 9 - 10: Color A White
Round 11 - 13: Color B Navy
Round 14 - 15: Color C Pewter
Etc...

This pattern continues and I did a total of 55 rows, but Paw Paw is a tall man so I wanted to make sure it covered him well. I  could use it as a blanket, but I'm short! The Red Heart pattern calls for 34 rounds which would be a nice sized lap blanket for someone like me.

It's an easy blanket to make and I know that Paw Paw will love having a Cowboy's themed blanket while he watches his football games and John Wayne movies in the comfort of his recliner.

Leave me comments if there are any questions or concerns!

Crochet Granny Square Lap Blanket in Dallas Cowboys Colors