Thursday, August 7, 2014

Fall Perfectly Pumpkin Crochet Basket - Free Pattern

Perfectly Pumpkin Fall Basket
My mother was in town recently and we took are usual pilgrimage to JoAnn's to oogle over yarn. I have her to blame for my crochet hobby and subsequent yarn addition. Lucky for us JoAnn's was have a clearance sale on some of their yarn! Many things had been picked over, but I was able to get five skeins of pumpkin colored yarn which gave way to a Fall inspiration.

This summer I learned how to crochet a basket which has been handy -- I made two! But I realized when making the baskets it would be really fun to make one to hold Halloween candy this Fall. It seems like every Halloween I buy tons of candy, but never really have a good candy bowl with which to distribute the candy. So why not make one?!


When I saw the pumpkin colored yarn I knew I had to have it - and it was 50% off the original price!  (All said and done this basket cost me under $10.) Now there is a difference with this yarn than others I used to make baskets: it's the bulky yarn. This particular yarn is Wool Ease Chunky by Lion Brand. It yielded a color hard to photograph, but a very nice basket!

After making the basket I was going to use black yarn and stitch a Halloween pumpkin face on it, but the more I thought about it the cheesier it was looking in my mind. So why not a little embellishment? So I made a leaf and corkscrew which almost looks like a pinecone!

I have written out the pattern along with the little embellishments I made for it below.

Apples! In a pumpkin basket! Cute!


Fall Perfectly Pumpkin Crochet Basket
Yarn: A chunky pumpkin colored yarn - 2 skeins will do. I used Lion Brand Yarn Wool-Ease Chunky yarn in Pumpkin.
You will also need a little bit of green and brown for the embellishments. I had scrap yarn on hand so I just used what I had.
Hook: The hook it calls for is a K or a 6.50mm, but to make the basket you want a tight stitch so I went down to an I or 5.50mm hook.
Pattern notes: So not only are you going with a smaller hook, but you are also going to hold two strands at once. It can be tiresome on the hands, but using two strands is what makes it stiff. Yes, you are decreasing your hook size AND using two strands at once - this will yield a sturdy basket, but it can be troublesome on the hands. Take breaks! Here's a picture of what I mean you have to use two strands at once:


Working with two stands means two skeins as well!
Pattern:To begin chain four, and then make a ring by slip stitching into the first chain you made. Chain three (this does not count as a double crochet).
Round 1: In the ring you made do ten double crochets. When you've made the last double crochet, slip stitch into the top of the first double crochet for that round. This technique will make a nearly invisible seam. Chain three to start the next row.
Round 2: Do two double crochets into the same stitch as the chain three, then do two double crochets into every stitch after that. You should now have twenty double crochets. Slip stitch into the top of the first double crochet. Chain three and now begins a new "rhythm" to the pattern.
Round 3: Do two double crochets in the same stitch as the chain three, one double crochet in the next stitch, two double crochets in the third, one double crochets in the fourth, two double crochets in the fifth, etc. Repeat this process all the way around, you should now have thirty stitches. Slip stitch into the top of the first double crochet. Chain three.
Round 4: Two double crochets in the same stitch as the chain three, one double crochet in each of the next two stitches, two double crochets in the next stitch, one double crochet in each of the next two stitches, etc. Repeat till all the way around. Slip stitch into the top of the first double crochet. Chain three.
Round 5: Two double crochets in the same stitch as the chain three, one double crochet in each of the next three stitches, two double crochets in the next stitch, one double crochet in each of the next three stitches, etc. Repeat till all the way around. Slip stitch into the top of the first double crochet. Chain three.
Round 6: Two double crochets in the same stitch as the chain three, one double crochet in each of the next four stitches, two double crochets in the next stitch, one double crochet in each of the next four stitches, etc. Repeat till all the way around. Slip stitch into the top of the first double crochet. Chain three.
Round 7: Two double crochets in the same stitch as the chain three, one double crochet in each of the next five stitches, two double crochets in the next stitch, one double crochet in each of the next five stitches, etc. Repeat till all the way around. Slip stitch into the top of the first double crochet. Chain three.
Round 8: Now you are finished making the bottom of your basket and it's time to make the sides. The stitch you are going to do is called a back post stitch where you actually crochet around the post of a double crochet. Here is a link to a tutorial on how to do this. It's a really neat stitch actually! If that tutorial doesn't work just search for double crochet back post stitch. Back to the pattern! Do a double crochet back post stitch in the same stitch as the chain two, then do the double crochet back post stitch all the way around. You hand might get tired! Once you've gone all the way around slip stitch into the top of first double crochet and chain three.
Round 9-12: From here on out the usual double crochet in each stitch with continue along with slip stitching into the top of the first double crochet and chaining three. You will do this for the next four rounds before it'll get interesting. And if your basket doesn't look quite right just give it a few rounds to take shape.
Round 13: This round we will create the handles. To do this do a double crochet in the next thirteen stitches, then skip the next nine stitches and instead chain eleven (this is the beginning of your handle). After skipping nine stitches do a double crochet in the next twenty six stitches. Here is the next handle, skip nine stitches and chain eleven. To finish off the round do a double crochet in the next thirteen stitches, slip stitch into the top of the first double crochet and chain three.
Round 14: Last round! Double crochet into each stitch include the chain eleven from the previous round. This will create good sturdy handles.

Here's a close up of the handles:


Embellishments:
Like I said earlier I debated putting a cute Halloween face on the basket, but I instead decided a little green leaf and corkscrew might look nice. Here are the patterns. Before you do any of these though I'd like to recommend to keep a long tail so that you have something to sew with when you attach to the basket.
Leaf:
Chain 14. In the second chain from the hook do one single crochet, in the next stitch do a half double crochet, then in the next three stitches do a double crochet in each. Then in the next three stitches do a triple crochet in each. Next you will reflect what you just did. Double crochet in the next three stitches, half double crochet in the next stitch and single crochet in the last.
Then you will chain three to make a bit of a stem. Slip stitch in to the third single crochet from your hook - this makes the tip of the leaf.
You just made one side of the leaf with the foundation chain representing the middle of the leaf. For the next part you will make the other half of the leaf which is a reflection of what you just did.
So working into the other side of your foundation chain single crochet in the first stitch of the chain, double crochet into the next one, then one double crochet in the next three stitches, triple crochet in the next three stitches, double crochet in the next three stitches, half double crochet in the next stitch, and then finally a single crochet in the last stitch. Fasten off and you have your leaf.
Corkscrew:
These are super easy! Just chain however long you want it to be - I did 25 because it seemed like a nice number. Then do two double crochet into the fourth chain from the hook. Then in every chain after that do three double crochets till you reach the end. Leave this tail long do you can use it to sew into the basket.
Sewing on the embellishments:
I used the long tails from the stem of the leaf and the corkscrew with a yarn needle to connect them to each other and then connected it to the basket. The leaf kept on rolling up on me so I took another strand of the green and sewed through the middle of the leaf onto the basket so it would hold. There's really no right or wrong way to do all this, just experiment and know that you can always rip it out if it doesn't work.

Here's a close up of the embellishments. I tried to rotate the photo, but technology is not being my friend.


Leaf and corkscrew. The green color did not photograph well, but I promise you it's a pretty color!
Now you should have a lovely fall basket! What shall you use it for? A centerpiece for fruit on your dining room table? A festive catch-all for the season? Fill it with pinecones, pumpkins, and other seasonal goodies? Or Halloween candy like I will?! The possibilities are endless!

If you have any questions just let them in the comments!


Wednesday, August 6, 2014

Learning to Knit from a Crocheter's Perspective

Knitting Versus Crochet
In July I began my adventures in learning how to knit - something most of my friends do, but I only know how to crochet. After a year of crocheting I felt like I was ready for a new challenge. There are a few things I have learned about knitting that a crocheter might find interesting so I decided to list them here. Maybe this will give you insight on if knitting is something for you or at least how to prepare yourself for talking with your knitting buddies.
 

So what is really the difference?
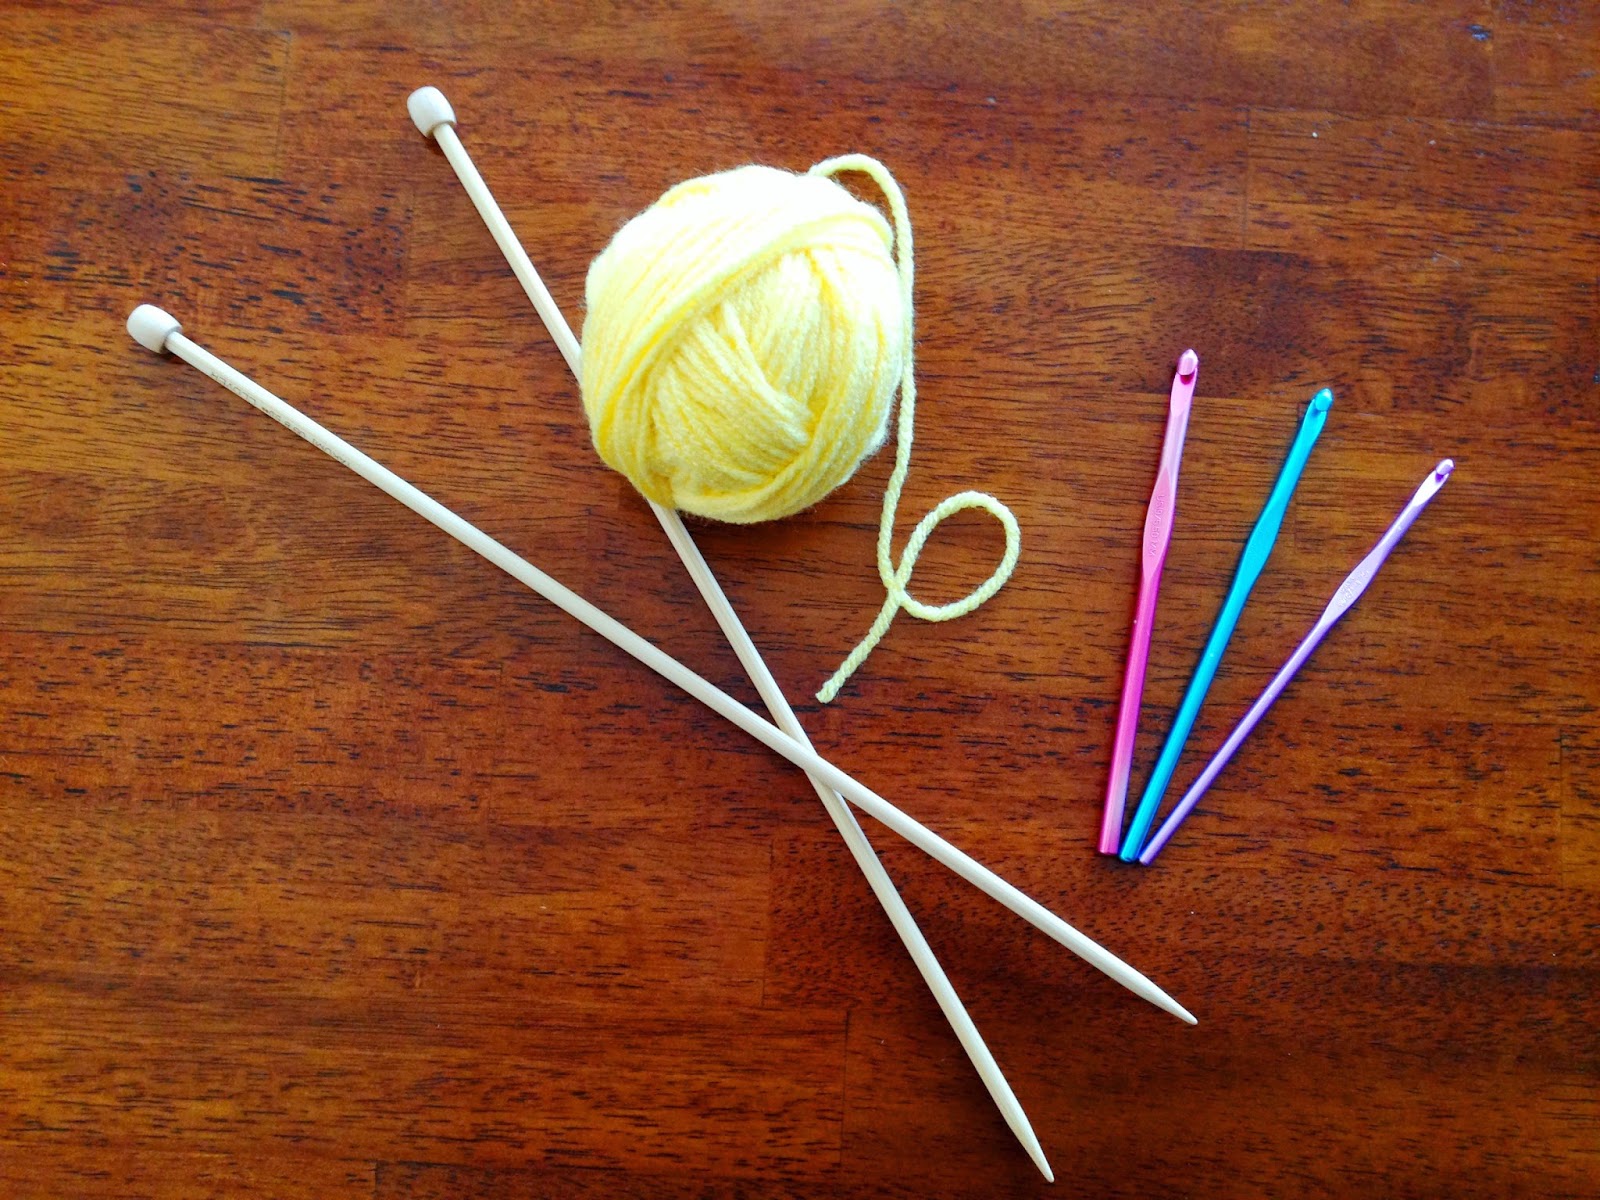
When people see me working on a crochet project and say, "Oh, you knit?" I promptly correct them which leads to a bit of confusion. From a crocheting perspective the best way I explain crochet versus knitting is knitting is with two needles and you "cast on" multiple lops or stitches. In crochet you have one hook and your stitches are done one at a time and are not left on the hook (generally speaking). I also like to point out some differences of crochet versus knit like crocheting goes faster making great for things like blankets, but takes more yarn than a knitting project. Knitting takes longer, which makes it great for small pieces, but doesn't use as much yarn which means you can use nicer yarns. Those are probably the big differences. So what advice can I give to crocheters wanted to knit?

Get Bamboo Needles
In crochet they type of hook doesn't really matter as most are metal or plastic. So when I would talk with my knitting buddies they were horrified that I was using metal hooks ... but crocheters think you're nuts for splurging on wooden ones. Here's why bamboo needles matter: The bamboo creates a little bit of friction which allows you to keep your stitches on your needle. Apparently, I don't know because I didn't buy them, the metal ones are too slippery and your stitches tend to slip off.

Nicer Yarn?
Like I said above, knitters love their nicer yarn and I can see why - you use less yarn. I have used "nicer" yarn (part wool, part acrylic) and it can still be pricey for a crochet project. So should you go out get a nice wool yarn for your first knitting project - NO! As with starting any project just get a cheap and simple yarn. I always have some Red Heart Supersaver in my stash so that's what I used to get started.

Casting On
Casting on is the equivalent of making a foundation chain in crocheting and is super easy because you only use one needle - almost like crocheting which is why I rock at it. It's a good confidence builder! My biggest advice is you do not need to cast on as many stitches in knitting as you would in crocheting a foundation chain. And of course keeping your stitches on the looser side makes it easer when you do the next row - good advice for both crochet and knit.

Tutorial that Rocks
I found this youtube tutorial that is how to knit (cast on, knit stitch, and bind off) from a crocheter! And she's really adorable! I also like this video because she shows you what to do if you dropped a stitch - which almost makes you want to give up when it happens to you. I recommend searching around the internet and using a few different videos to get different perspectives on how to knit.

Binding Off
The last step of learning how to knit was the binding off process. This carefully takes the loops of your needle one at a time. It was really pretty easy, but this isn't a process that needs to be done in crochet so yet another means for comparison.
My first knitting "project"!
I just finished my first "project" which was a coaster. It was fairly easy and I'm looking forward to learning a the purl stitch. Here is what I ended up with. Not too bad, but I'm learning!

Other Differences
The last biggest difference between crochet and knitting that I have observed is that crochet can make lots of different things whereas I feel knitting is a little more limited. I think this is due to the fact that crochet has multiple kinds of stitches, but at the same time I think knit can make better cold weather clothes like sweaters. There are also WAY more different types of knitting needles than there are crochet hooks. Both needle crafts have their merits and I am probably a little biased, but this my blog gosh darn it! :-)

As of now those are my insights to knitting from a crochet perspective. I think the biggest thing to remember is that you will NOT be good the first few times you do something - it's like learning how to do anything. You will make mistakes, it won't look at that pretty, but you have to stick with it. Lord knows I have set down a few projects because I got fed up with them and that's ok. Every project is a learning process and I can already see all the new things I will be learning with knitting.

Sunday, August 3, 2014

Crochet version of Jayne Cobb's hat from Firefly - Free pattern tips and notes

Crochet Jayne Cobb Hat

Ever since I learned how to crochet my darling husband has been begging me for a hat just like Jayne Cobb got from his mom in the TV series Firefly. Since we were traveling for vacation and I needed a small project to travel with I thought, "why not?! I'll finally make this hat he wants!" Granted the hat Jayne wears in Firefly is actually knitted, not crocheted you can still yield a similar hat.  I made a few tweaks to the hat pattern just based on what I thought looked good for the hat and how it looked on my husband.


The pattern is super easy and I just so happened to have the right colors on hand. You really don't need much of all three colors, but I had just a little of orange so I just used a little more of the yellow. The number of rows for the orange and yellow really don't matter, but I'll break down what I did for my Jayne Cobb hat.

The only space traveling creature I could find to model the hat. Good job Alf!

Yarn used (again, one skein will produce you numerous Jayne hats):
  • Red Heart with Love Daffodil (for the yellow)
  • Red Heart Super Saver Carrot (for the orange)
  • Red Heart with Love Berry Red (for the red)

Tip: I recommend you practice making a hat with scrap yarn before starting on this project. Also when I make a hat I use the "nearly invisible seam" pattern.

Pattern & Notes:
With your yellow color: To start a hat use a magic ring or chain four (I tend to chain rather than just the magic ring because I can never remember how to do the magic ring). Slip stitch in to the first chain to make your hat ring.
Round 1: Chain three (this does not count as a stitch), then do ten double crochets into the ring. Slip stitch into the top of the first double crochet in your magic ring.
Round 2: Chain three (again this does not count as a stitch because when you slip stitch into the top the first double crochet you are covering this chain three **video tutorial on how to do this**). In the same chain three stitch do two double crochets, then in every stitch after that you will do two double crochets. You should have twenty double crochet stitches. Slip stitch into the top of the first double crochet in that round.
Round 3: Chain three, and in the same stitch do two double crochets. In the next stitch only do one double crochet. In the next stitch do two double crochets - you will continue on this pattern of one double then two double till you have thirty stitches. (The hat increases by multiples of ten). Slip stitch into the top of the first double crochet in that round.
Round 4: Chain three, and in the same stitch do two double crochets. In the next two stitches only do one double crochet in each, then do two double crochets in the following stitch. Essentially the pattern is two double crochets in one stitch and then one double crochet in the following two stitches. And slip stitch into the top of the first double crochet in that round to join.
Round 5: Chain three, in the same stitch do two double crochets, then one double crochet in the next three stitches, and repeat this pattern (two in one and one in the next three) till you get all the way around and slip stitch into the first double crochet of that round to join.
Tip -- when you do two double crochets in the same stitch this is known as "increasing" which is what I making your circle get bigger.
Round 6: Chain three, in the same stitch do two double crochets, then one double crochet in the next four stitches, and repeat this pattern (two in one and one in the next four) till you get all the way around and slip stitch into the first double crochet of that round to join.
At this round if the space warrior you are making the hat for has a small head then skip to the directions below. If they have a little larger head continue to the next round.
Round 7: Chain three, in the same stitch do two double crochets, then one double crochet in the next five stitches, and repeat this pattern (two in one and one in the next five) till you get all the way around and slip stitch into the first double crochet of that round to join.
At this round if the Serenity smuggler you are making the hat for has a medium sized head then skip to the directions below. If they have a larger head continue to the next round (this was my husband's case)
Round 8: Chain three, in the same stitch do two double crochets, then one double crochet in the next six stitches, and repeat this pattern (two in one and one in the next six) till you get all the way around and slip stitch into the first double crochet of that round to join.

So now you are done making the crown of the circle (again depending on what round you stop on depends on the size of your Serenity mercenary's head). If you have to rip out your stitches later to make it larger or smaller don't despair! Crochet goes quickly and all errors can be fixed easily.

At this point you might consider switching to the orange color and that is up to you, but since I had a little less than the yellow I just kept with yellow for the next following rounds.


My other, but more unwilling model, our giant space sheltie Duke.
For the next 5 rounds (decrease to four if you went to round 8 as stated above) you will chain three, do one double crochet in the same stitch as your chain three, then do one double crochet in ever stitch after that then joining the round with a slip stitch into the top of the first double crochet.

What this does is create the sides of your hat - now it'll start to look like a hat! Feel free to change to the orange color at any point in time, but here's what I did:

For the next 6 rounds switch to the orange color if you haven't already. This will conclude the base of your hat.

Close up of the smaller ear flaps I made. They can be made bigger! Just follow the directions!

Next we will switch to the ear flaps. You will find that you want your ear flaps to be closer to the seam rather than be equal distance apart. So I counted ten stitches away from the seam and made the first ear flap. To do so, I did one row of about 14 single crochets (although I'd use double if I got to go back and redo it because it would make the ear flaps longer) and did that for about four rows, and chain one to when you turn your work, before I started decreasing my stitches (again, if you want to make the ear flaps longer just do another row or two - I made mine shorter because I thought it looked better for my project and personal Independence fighter).

For the decrease (tapering the ear flaps) you will first do a single crochet (or double crochet) together which is printed in patterns at sc2tog or dc2tog and I have linked two tutorials to those decreases. But back to the pattern, for row 5 do a decrease stitch, in my cause I did a single crochet together, then single crochets across until I get to the last two stitches. Then again, in the last two stitches, do a single crochet together. Turn your work, chaining one and repeat the decreasing process above. I repeated this process until I had two stitches left at which point I cut my yarn leaving a 4 to 6 inch tail and pulled through my last stitch to finish it off. I also tied a knot in the tail so it wouldn't ravel.

For the ear flap tails, the picture shows multiple strands, but I only did one. It's up to you!

The next ear flap was tricky to figure our the distance so I called the husband into the room and found that I needed to count 12 stitches from the seam to make the next ear flap. Repeated the process above and then it's time to make the pom pom.

A good tip I've heard is to trim up the pom pom because the shorter the yarn the more "poofy" it looks.

I have never made a pom pom so I went to the interwebs to learn how! This blog has great pictures and explains wonderfully how to make a pom pom. But my tips for this hat is to take all three stands of yarn in your hand at once and wrap them over your hand multiple time -- the more the better! I used a bit of yellow yarn since that is the color used where the pom pom will be secured. 


Pom pom on the Jayne hat.
I'm still playing with how to secure the pom pom properly, but the website I cited above may prove to be helpful with that.

Once your yarn tails are sewn in (not the tails of the ear flaps though) you will have a hat perfect for a Canton hero. Fun and EASY project for nerds alike! Enjoy!

Friday, July 11, 2014

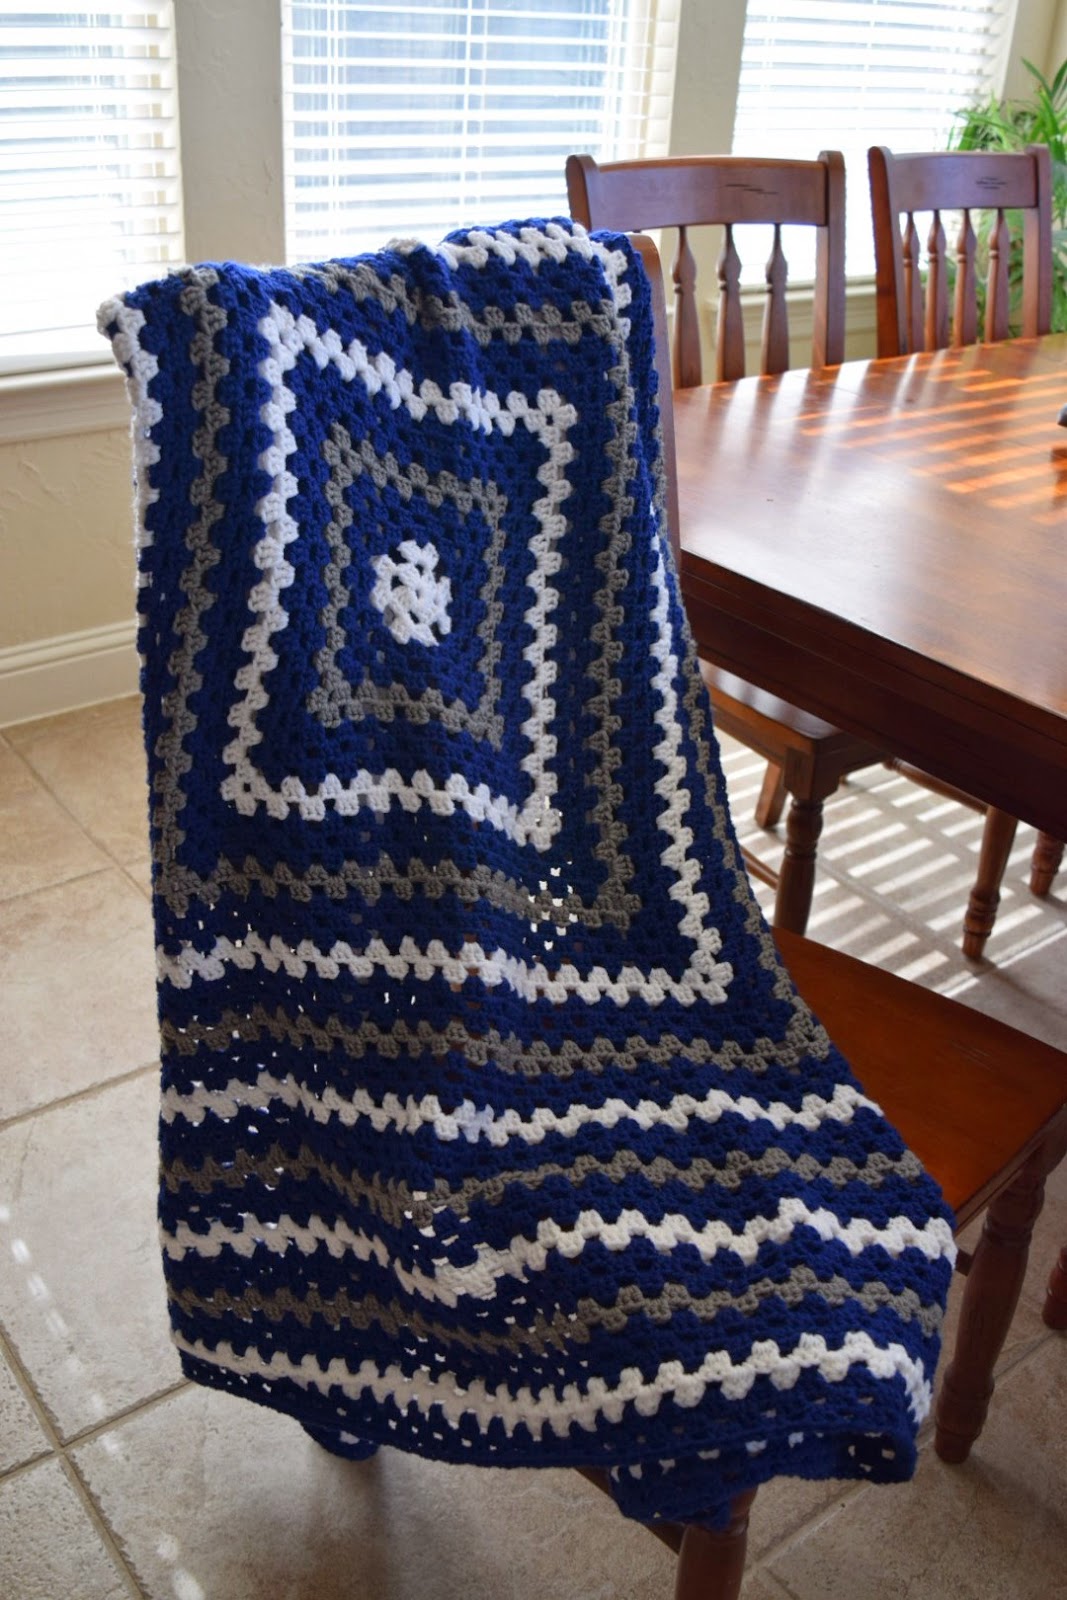
Crochet Granny Square Lap Blanket in Dallas Cowboys Colors Free Pattern Written Out for Beginners

Crochet Granny Square Lap Blanket in Dallas Cowboy Colors

This past spring my husband, and I along with his parents took a trip to visit his grandfather who we affectionately call Paw Paw.  He is a lively man who will tell you all kinds of jokes, tell you stories about his Cajun living in Louisiana, and even show you a magic trick.

While visiting Paw Paw we noticed his small apartment had outdated pictures of my husband and I so I made a mental note to print and mail him updated pictures. We also noted his picture of Pope Benedict need to be replaced with a current one of Pope Francis - I also made a metal note to find him an updated one since I work in a Catholic school after all.

Then while Paw Paw was teaching my husband how to cook a nice shrimp etouffee he commented that he had trouble finding the Cajun seasonings he like. In made a final mental note, that since we were close to Louisiana than Paw Paw that I would make sure to grab some of his favorite Cajun seasonings ... that is along with printing updated family pictures, and a picture of Pope Francis.

Lo and behold I had a care package building to send Paw Paw!

However, the items seemed small, and I felt like one more personal item was needed. What can I add to his care package? He loves the Dallas Cowboys, but I never found anything I liked. So what should I send him? Of course! I could crochet something for him!

My struggle was I didn't want a blanket that would take a lot of time (most take about three months) and having worked with granny square rounds I knew they went quick. So I started with that idea - a granny square motif, but not individual granny squares because sewing them together can take a while as well.

During my search I found this lap blanket that inspired me: http://www.redheart.com/free-patterns/crochet-granny-blues-lapghan 

Better yet, the colors inspired me to crochet the blanket using the colors of his beloved football team the Dallas Cowboys. Now say what you want about the Dallas Cowboys, but Paw Paw is a huge fan and I will not argue with an old man. So off to Joann's I went to pick out the yarn and then sat down to figure out how I wanted to do the pattern to my liking.

The finished product with a few modifications to the original pattern.
The pattern PDF can be found by either clicking the link above or this link right here.

Here are the modifications and specifics of how I did this lap blanket.

Crochet Granny Square Lap Blanket in Dallas Cowboys Colors Free Pattern Written Out for Beginners

Yarn:
Red Heart with Love in White (Color A) and I used about 3 skeins for this project
Red Heart with Love in Navy (Color B) and I think I used about 5 to 6 skeins.
Red Heart with Love in Pewter (Color C) and again about 3 skeins.
**Note: The pewter color is a smooth grey (not "heathered") and makes for a great accent color since this is one of the Cowboy's accent colors along with the white. This additional color really makes the piece say "Dallas Cowboys!"
Here pictures of the colors close up to give you an idea:


Other Materials:
Crochet hook size I-9/5.50mm
Yarn Needle to sew in the tails

Read Red Heart's pattern to get started because the first few rounds are a little different. The over all pattern though is to do three double crochet clusters with a chain between them with three chains acting as the corner. What I love about this pattern is how easy it is to figure out - perfect for beginners - because you don't have to go into stitches, you just crochet into empty spots. The advantage of this is if you drop a stitch (like I did a few times) it does not ruin your project.

Close up to show you the clusters.
Can't read traditional patterns?
I've written out the pattern here for those of you who are not good at reading patterns as I was when I first started - the language is foreign! I even put in links to about.com's website tutorials. If these tutorials don't work for you just keep on googling till you find pictures or videos that work.

Pattern:
Take your first color (color A), in my case this was white and make your slip knot. This does not count as your first stitch. Next chain five and then slip stitch into the first chain to make a ring.

Round 1:

  • Now you are going to start your first round and you will do this by crocheting your stitches into the ring you just made. The tail might get in the way so just watch what yarn you are working with - we'll deal with the tail later. For this round, hold your circle and chain three. This is going to count at your first double crochet "into" the ring. A chain three is about the same height at a double crochet which is what you are going to do next. 
  • Now that you have your chain three, double crochet two times into the empty space of the ring (note you are not crocheting into any stitches, you are crocheting into the empty space of the ring. After you have done this you should have a chain three stitch right next to your two double crochets - a nice cluster!
  • Ready for the next step? Now chain three again. The purpose of this chain three is to act as the first corner of your square - this will be important later. 
  • Next double crochet three more times into the ring. If it's getting crowded in the ring, it's ok! 
  • Again chain three to make the second corner of your square. 
  • Double crochet three more times into the ring.
  • Chain three to make the third corner of your square.
  • Double crochet three more times into the ring.
  • Chain three to make the fourth and last corner of your square.
  • Let's finish off this square and you'll do this by joining your chain three into the first double crochet with a slip stitch.
  • You should have four clusters with four chain three spaces.  Any time you make a corner (or chain three space) this will be used in the next round.
  • Note: do not flip your work! One of the unique things about rounds is you always work with one side and do not turn your work like you would if you were working in rows. This is rounds meaning you go around and around as you work.
Round 2

  • Let's start the next round, still with white (color A), slip stitch in to the next double crochet and into the first corner - what you are doing here is "moving" your stitch through the double crochets so that we can get our hook to the corner. You're not really creating stitches, you're just moving your yarn along the row.
  • Once you have your slip stitch in the first corner, chain three like you did after you made the ring in the first round. 
  • Double crochet two times into the corner.
  • Like the previous round, you will chain three to create a corner (this is the corner we will use for the next round) then double crochet into the same corner (chain three space) you just used in the previous step. The purpose of this is to create a corner for this round - still with me?
  • I'm about to throw you for a loop, pun intended, you will just chain one now. You are creating the side of your square. Anytime you chain one that is a side, a chain three is a corner.
  • After the chain one you will double crochet three times in the next corner (or chain three) space.
  • Chain three to create a corner for the next round.
  • Then double crochet three times into the same corner (or chain three) space. You just created two corners and a side to your square.
  • Next chain one, to creating a side to your square.
  • Double crochet three times into the next corner (or chain three) space, chain three to create a corner for the next round, and double crochet three times into the same corner.
  • Chain one and join with a slip stitch into the first double crochet like you did the previous round.

The rounds repeat like this and follow your typical granny square pattern so if you're still having trouble with it I recommend looking online on how to do a granny square. They're easy and forgiving to mistakes you may make.

Essentially you are adding one cluster of double crochet to each side with each round. Keep in mind this pattern makes a square, not a rectangle.

The overall pattern for the colors is as follows:

Round 1 - 2: Color A White
Round 3 - 6: Color B Navy
Round 7 - 8: Color C Pewter
Round 9 - 10: Color A White
Round 11 - 13: Color B Navy
Round 14 - 15: Color C Pewter
Etc...

This pattern continues and I did a total of 55 rows, but Paw Paw is a tall man so I wanted to make sure it covered him well. I  could use it as a blanket, but I'm short! The Red Heart pattern calls for 34 rounds which would be a nice sized lap blanket for someone like me.

It's an easy blanket to make and I know that Paw Paw will love having a Cowboy's themed blanket while he watches his football games and John Wayne movies in the comfort of his recliner.

Leave me comments if there are any questions or concerns!

Crochet Granny Square Lap Blanket in Dallas Cowboys Colors 

Saturday, June 28, 2014

Tomato Basil Soup with a Kick!


Another busy day of running errands and chores left me wanting to create something. My crochet hooks weren't inspiring me so I got to work in the kitchen to make a fun lunch.

Tomato basil soup with a grilled cheese sandwich in the background. I'll take credit for the soup, but the grilled cheese was all my husband!

I looked in my fridge to find some leftover evaporated milk from a Mac and Cheese recipe and then realized I have a can if tomato sauce AND fresh basil!  So my own version of tomato basil soup was born!

Husband's grilled cheese on whole wheat.

The husband added on a nice grilled cheese sandwich which was wonderful to dip into the soup.

The recipe is as follows:

Tomato Basil Soup with a Kick! 
Serves 4, Cook & Prep 30 minutes

1 can of tomato sauce
1 can of diced tomatoes
1 cup of evaporated milk (or substitute cream for a creamer version)
3 tablespoons of butter
A dozen large basil leafs
6 fresh oregano leafs
2 teaspoons red pepper flakes (leave out if you don't want it spicy)
2 teaspoon garlic powder (or one clove fresh)
1 teaspoon onion powder
Salt and pepper to taste

Directions:
In a sauce pan on th stove combine the tomato sauce, evaporated milk, butter and start to heat on medium-low heat while you prep everything else.
Open the can of diced tomatoes and drain the liquid out of them, a strainer might be nice to use. The diced tomatoes I tend to buy are large so I put the tomatoes on a cutting board and chopped them up finely. Next time I'll probably just use a food processor to get them finely chopped. I also tried to strain as much liquid out of them as I could because otherwise it'll make the soup more watery than creamy. At least that's my trick.
Next, I plucked about a dozen large basil leafs from our love basil plant on our kitchen table along with about 6 oregano leafs. Fresh basil really makes this soup shine so try to use fresh basil leafs if you can get them. The oregano on the other hand does not have to be fresh, I just happened to have some. If you use dried oregano I would just use about a teaspoon or so. 
Lastly, toss in the rest of the spices, red pepper flakes, garlic, and onion powder and then salt and paper to taste. 
Heat on medium high till slightly bubbly, then turn heat on low and cover. Let it simmer for about 20 minutes for the spices to blend.
Lastly, I topped the soup with a little bit of mozzarella cheese. Yummy!

Bubbly goodness!

For the grilled cheese we used whole wheat bread, sliced cheddar cheese and a bit of melted butter on the outside of the sandwich. He grilled it up old-school style and it was wonderful to dip into the soup! 


Easy to make and delicious lunch! Enjoy!


Thursday, June 12, 2014

Variation on Chunky Crocheted Basket

This week I took two tries at a new pattern: chunky crocheted basket!


My second attempt and I think it turned out very pretty and functional! 


I have always wanted to learn how to crochet a basket. I would always giggle seeing crocheted baskets on sale at Target or other home decor stores because I thought, "I could make something like that." Since I'm I between projects I found this cute pattern on (you guessed it!) Pinterest from Crochet in Color's blog.

Chunky Crochet Basket Pattern

http://crochetincolor.blogspot.ca/2012/02/chunky-crocheted-basket-pattern.html

I read the pattern and it called for the super bulky yarn I had just finished using on the afghan blanket I just finished (see previous post). Since I had some of the yarn left over I thought I'd give it a go. However, there were a few things this pattern called for that I didn't have: a size L or 8.00 mm hook. I had an N or 10.00mm and a K or 6.50mm hook. 

I also realized that I didn't have enough yarn because what the pattern asks you to do is to use two strands of the same color as once. 

If you have never used two strands of yarn at once it is really cool. You'll need a slightly bigger hook for it, but it yields results that give you a heathered look. The picture below is a shawl I started making I which I first used this technique. The yarn was red heart soft left over from a previous project and I used a K or 6.50mm hook.


Shawl I started making using two strands at once. A little tiresome for the hands, but pretty results. 


So I had some decisions to make since I didn't have enough yarn for two strands and I didn't have the right size hook. If you read in the pattern you need a smaller hook than the N (10.00mm) I had because the tighter stitch will give the basket the ability to hold shape and stand up stiffly. 

So what I concluded, I would use my super bulky yarn I had left over (Lion's Brand Thick and Quick) and use my K (6.50mm) hook since I was using only on strand. I didn't know if I'd have enough yarn to hold two and I didn't think a K hook could hold two super bulky yarns any way.

For my first try it turned out pretty good! It wasn't ask stiff which I concluded could be fixed with having multiple strands rather than the size of the hook. I rushed when I made the one above and added in a few stitches, but it still turned out pretty and functional.


My first go at it! I like the coloring of this basket too. This yarn is the super bulky lions brand thick and quick.


Since I gave the basket away, I was itching to try to pattern again, but this time I took a different approch. I didn't have enough of the super bulky yarn, so I picked up my cheap yarn.

I keep around a few skeins of cheap yarn like Caron's yarn by the pound. It's not the softest or the best colors, but I use it to practice new stitches or try out a little project. 

I picked up a dark red color, and a grey color I had along with my K (6.50mm) hook and started the pattern again.

Here is a link to the pattern: http://crochetincolor.blogspot.ca/2012/02/chunky-crocheted-basket-pattern.html
I do not want to copy and paste it because it is not my work. But I will share with you some of the changes I made.

What would soon be my new variation on the chunky basket.


For my basket (above) I went seven rounds for the base of the basket (one more than in the pattern) because I wanted a larger basket. Keep in mind, the larger the base of your basket, the longer it will take to make the side of the basket.

After round seven, follow the pattern (her round seven, my round eight).  I thought the way she described this round was interesting and I've interpreted it a few ways, but when I made these baskets I interpreted it as a back post stitch like I did in my previous afghan blanket. So that's what I did and it worked! 

I'm still not 100% certain that's what the pattern says, but it worked for me. I will caution you, that as you do this back post stitch and then start the next few rounds it doesn't look like a basket. It really isn't until you're about four rounds in that it takes shape so be patient. 

In the pattern she trades off with single crochets and half double crochets and works in the back loops (back post stitch). I didn't want to experiment with that yet so I just did a half double crochet all the way around. 

For the side of the basket I did twelve rounds before I made the handles. The handles in the pattern came out a bit smaller than I liked the first time I did the project so I made a few modifications again.

In the original pattern it says to chain 7 and skip 5 spaces. I chained 11 and skipped 9. I also had to do a little math because my basket is one round larger. So I took the number of stitches I had in a round (let's say 58), divided it by two giving you one side of your basket (58 divided by 2 is 29), then subtracted 9 (29 - 9 = 20) then divde that number by two (20 divided by 2 is 10). That's how many stitches I would do, then chain 11 skipping 9 spaces. 

So in the example above I would do 10 hdc, chain 11 skipping 9, hdc 20, chain 11, skip 9, hdc 10.

If I recall correctly my numbers didn't come out all the pretty, but it works more or less. I will probably always be making modifications and improving this pattern to my liking. 

The last thing I changed is in the original pattern she has you do another round after making the handles to make the handles more sturdy. I actually did another two rounds to make them extra sturdy and I think it turned out beautifully. 


I have to say I like the larger handles. 


Sorry if some of the pictures were dark, it's been rainy here, but I'm not complaining! Rainy days are the best days to crochet.

By the way, you may be asking, what do I do with this basket when I'm done? I keep it by my sofa and it's what the remotes and cell phones go into while we're watching a movie. I hate having to relocate cell phones and remotes during a movie at home - now they're all in one place!  

Leave me comments and questions! 

Monday, June 9, 2014

Chunky back post stitch masculine afghan blanket

Back in February I had a friend approach me about making an afghan blanket for her husband's birthday. She had seen some of the afghans I had made since I starting learning how to crochet.


The finished product!

She wanted a blanket in specific colors, orange and green, that had a chunky knit look to it. The back post stitch (directions below) allows for the top of a double crochet stitch to be pushed out giving it the appearance of a cable knit with it's raised ridge. After agreeing to a design it was time to get to work!

The raised stitch can be seen in this picture captured by my amazing husband! 

This is my first commissioned project! I was a little uncertain how to charge her because we're friends! I don't want to take money my friends especially when crocheting is a labor of love. So she agreed to buy the yarn since that tends to be the deciding factor on how pricey the projects gets.  And for those who do not crochet a project can go anywhere from $25 with the by-the-pound super cheap yarn to upwards $100 for nice acrylic yarn to $200 for wool blends or nicer non-acrylic yarn.

Regardless, a beautiful blanket is produced for an individual to use and love for years to come!

Here is the general pattern for this back post stitch (directions for this stitch below) afghan blanket.


Yarn: I used Lion Brand Wool Ese Thick and Quick in Barley (color A), Clinatro (color B), and Pumpkin (color C).
Hook: I used an N or 10.00mm, but you could use as small as a K or 6.50mm. I wouldn't use too small of a hook though because you have to work into the stitch in a unique way for the back post stitch do you don't want things too tight.
Level: beginner.
Time: took me about three months which is the average length of time it takes me to make an afghan blanket of this size.

Foundation chain: using color A there is really no need to count here, however, when doing the foundation chain either go up one hook size or make a loose chain. This is good advice whenever you're making a foundation chain because if they are too tight it can be impossible to works to for your first row. Make your foundation chain as wide as you want your blanket to be. I usually for about 4 feet to about 4.5 feet. 

After you have the desired width for your blanket measured out on your foundation chain, chain two more to turn and flip your work.

Row 1: double crochet in the third chain from the hook, and double crochet into each of the chains will you reach the last chain. Chain two for the turn and flip your work.

*note - normally you would chain three for the height of a double crochet, but because you will be working into the double crochet with the back post stitch it actually makes the double crochet shorter so you only need a height of a chain two. The double crochet is shorter because you are working a double crochet around the post of the double crochet in the row below which pushes the top of it out. Instead of working double crotchets to stack them on top of each other, you are layering the double crochets into each other.

Various Directions on how to do a back post double crochet stitch: 
FiberFlux Blog - http://www.fiberfluxblog.com/2014/04/how-to-work-back-post-double-crochet_3.html?utm_source=feedburner&utm_medium=email&utm_campaign=Feed:+blogspot/OeRXj+(Fiber+Flux...Adventures+in+Stitching)
(It's a front post, but you'll get the idea) ClassyCrochet Blog - http://classycrochet.wordpress.com/2013/01/08/how-to-front-post-double-crochet-fpdc/
Then there are numerous YouTube videos if you just search for the stitch.

Rows 2-10: with the same color you've been using for color A you will stitch do a double crochet back post stitch all the way across, doing a chain two to turn your work at the end of each row. The total of 10 rows will equal about 6 inches 

Rows 11-21: with color B do the same back post stitch for the next 10 rows.
Rows 22-32: with color A do the same back post stitch for the next 10 rows.
Rows 33-43: color C, same back post stitch for the next 10 rows.
Rows 44-54: color A, same back post stitch for the next 10 rows.
Rows 55-65: color B, same back post stitch for the next 10 rows. 
Rows 66-76: color A, same back post stitch for the next 10 rows. 
Rows 77-87: color C, same back post stitch for the next 10 rows.
Rows 88-98: color A, same back post stitch for the next 10 rows.
Rows 99-109: color B, same back post stitch for the next 10 rows.
Rows 110-120: color A, same back post stitch for the next 10 rows. 

That should give you about a five and a half foot blanket which is nice and snugly for one or two people.

Finishing: Before sewing in the tails where you joined yarn or changed colors throw the blanket in the wash on the cold water setting, then tumble dry on medium to low heat. Then sew in the tails.

My only warning with this blanket is that it is HEAVY! After about half way done with the project I could not transport it easily so it had to stay at home.

Here's how much yarn you will need 
Color A (in my case barley): about 15 skeins of yarn (although it might end up closer to 18 depending on how tight you crochet or if you expand your length/width).
Color B (in my case cilantro): about 9 skeins of yarn.
Color C (in my case pumpkin): about 6 skeins of yarn. 

To give you an idea of price the lion brand wool ease thick and quick is abut $5.26 a skein at Walmart.com. For the yarn totals above the project comes out to $173.58 before sales tax. Shocking right?! Thankfully my friend paid for a majority of the yarn and then we bartered for the rest (in true southern style she gave me yummy yummy deer meat!).


This project was fun and a unique challenge. It makes a very thick, chunky, heavy blanket for a cold winter night. I also liked this pattern because it looks masculine blanket which can be hard to pull off. Please leave me a comment if you have any questions!  Enjoy!