Friday, July 11, 2014

Crochet Granny Square Lap Blanket in Dallas Cowboys Colors Free Pattern Written Out for Beginners

Crochet Granny Square Lap Blanket in Dallas Cowboy Colors

This past spring my husband, and I along with his parents took a trip to visit his grandfather who we affectionately call Paw Paw.  He is a lively man who will tell you all kinds of jokes, tell you stories about his Cajun living in Louisiana, and even show you a magic trick.

While visiting Paw Paw we noticed his small apartment had outdated pictures of my husband and I so I made a mental note to print and mail him updated pictures. We also noted his picture of Pope Benedict need to be replaced with a current one of Pope Francis - I also made a metal note to find him an updated one since I work in a Catholic school after all.

Then while Paw Paw was teaching my husband how to cook a nice shrimp etouffee he commented that he had trouble finding the Cajun seasonings he like. In made a final mental note, that since we were close to Louisiana than Paw Paw that I would make sure to grab some of his favorite Cajun seasonings ... that is along with printing updated family pictures, and a picture of Pope Francis.

Lo and behold I had a care package building to send Paw Paw!

However, the items seemed small, and I felt like one more personal item was needed. What can I add to his care package? He loves the Dallas Cowboys, but I never found anything I liked. So what should I send him? Of course! I could crochet something for him!

My struggle was I didn't want a blanket that would take a lot of time (most take about three months) and having worked with granny square rounds I knew they went quick. So I started with that idea - a granny square motif, but not individual granny squares because sewing them together can take a while as well.

During my search I found this lap blanket that inspired me: http://www.redheart.com/free-patterns/crochet-granny-blues-lapghan 

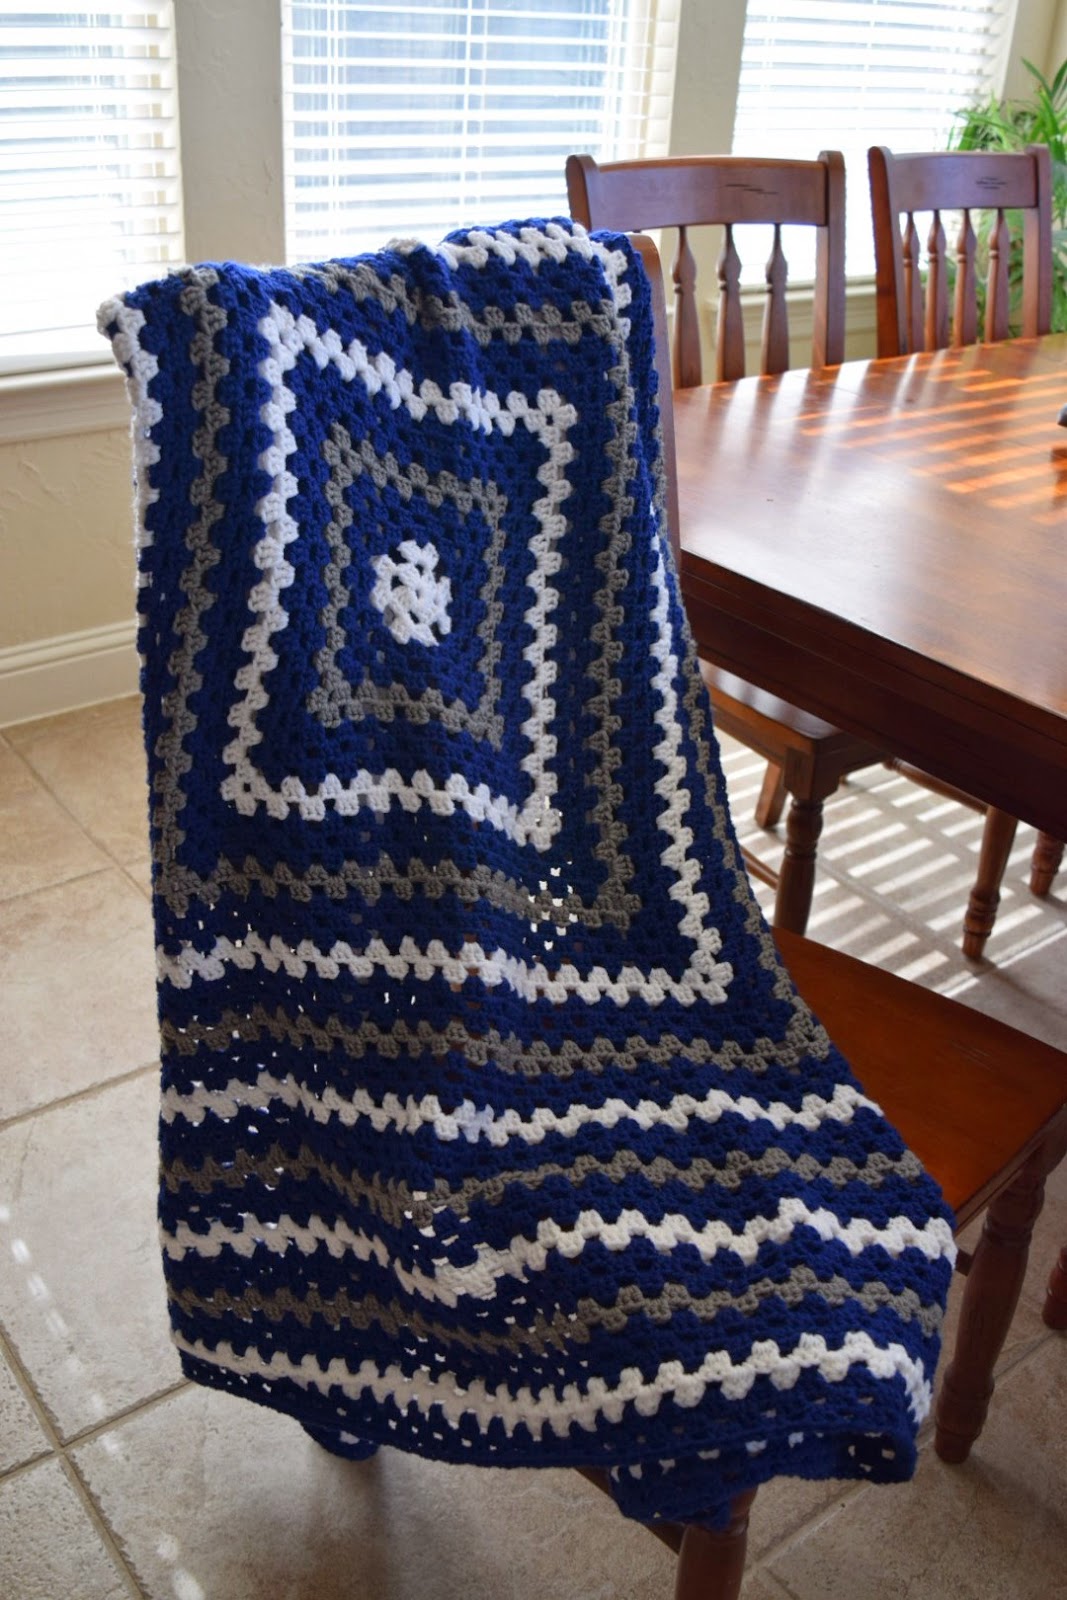
Better yet, the colors inspired me to crochet the blanket using the colors of his beloved football team the Dallas Cowboys. Now say what you want about the Dallas Cowboys, but Paw Paw is a huge fan and I will not argue with an old man. So off to Joann's I went to pick out the yarn and then sat down to figure out how I wanted to do the pattern to my liking.

The finished product with a few modifications to the original pattern.
The pattern PDF can be found by either clicking the link above or this link right here.

Here are the modifications and specifics of how I did this lap blanket.

Crochet Granny Square Lap Blanket in Dallas Cowboys Colors Free Pattern Written Out for Beginners

Yarn:
Red Heart with Love in White (Color A) and I used about 3 skeins for this project
Red Heart with Love in Navy (Color B) and I think I used about 5 to 6 skeins.
Red Heart with Love in Pewter (Color C) and again about 3 skeins.
**Note: The pewter color is a smooth grey (not "heathered") and makes for a great accent color since this is one of the Cowboy's accent colors along with the white. This additional color really makes the piece say "Dallas Cowboys!"
Here pictures of the colors close up to give you an idea:


Other Materials:
Crochet hook size I-9/5.50mm
Yarn Needle to sew in the tails

Read Red Heart's pattern to get started because the first few rounds are a little different. The over all pattern though is to do three double crochet clusters with a chain between them with three chains acting as the corner. What I love about this pattern is how easy it is to figure out - perfect for beginners - because you don't have to go into stitches, you just crochet into empty spots. The advantage of this is if you drop a stitch (like I did a few times) it does not ruin your project.

Close up to show you the clusters.
Can't read traditional patterns?
I've written out the pattern here for those of you who are not good at reading patterns as I was when I first started - the language is foreign! I even put in links to about.com's website tutorials. If these tutorials don't work for you just keep on googling till you find pictures or videos that work.

Pattern:
Take your first color (color A), in my case this was white and make your slip knot. This does not count as your first stitch. Next chain five and then slip stitch into the first chain to make a ring.

Round 1:

  • Now you are going to start your first round and you will do this by crocheting your stitches into the ring you just made. The tail might get in the way so just watch what yarn you are working with - we'll deal with the tail later. For this round, hold your circle and chain three. This is going to count at your first double crochet "into" the ring. A chain three is about the same height at a double crochet which is what you are going to do next. 
  • Now that you have your chain three, double crochet two times into the empty space of the ring (note you are not crocheting into any stitches, you are crocheting into the empty space of the ring. After you have done this you should have a chain three stitch right next to your two double crochets - a nice cluster!
  • Ready for the next step? Now chain three again. The purpose of this chain three is to act as the first corner of your square - this will be important later. 
  • Next double crochet three more times into the ring. If it's getting crowded in the ring, it's ok! 
  • Again chain three to make the second corner of your square. 
  • Double crochet three more times into the ring.
  • Chain three to make the third corner of your square.
  • Double crochet three more times into the ring.
  • Chain three to make the fourth and last corner of your square.
  • Let's finish off this square and you'll do this by joining your chain three into the first double crochet with a slip stitch.
  • You should have four clusters with four chain three spaces.  Any time you make a corner (or chain three space) this will be used in the next round.
  • Note: do not flip your work! One of the unique things about rounds is you always work with one side and do not turn your work like you would if you were working in rows. This is rounds meaning you go around and around as you work.
Round 2

  • Let's start the next round, still with white (color A), slip stitch in to the next double crochet and into the first corner - what you are doing here is "moving" your stitch through the double crochets so that we can get our hook to the corner. You're not really creating stitches, you're just moving your yarn along the row.
  • Once you have your slip stitch in the first corner, chain three like you did after you made the ring in the first round. 
  • Double crochet two times into the corner.
  • Like the previous round, you will chain three to create a corner (this is the corner we will use for the next round) then double crochet into the same corner (chain three space) you just used in the previous step. The purpose of this is to create a corner for this round - still with me?
  • I'm about to throw you for a loop, pun intended, you will just chain one now. You are creating the side of your square. Anytime you chain one that is a side, a chain three is a corner.
  • After the chain one you will double crochet three times in the next corner (or chain three) space.
  • Chain three to create a corner for the next round.
  • Then double crochet three times into the same corner (or chain three) space. You just created two corners and a side to your square.
  • Next chain one, to creating a side to your square.
  • Double crochet three times into the next corner (or chain three) space, chain three to create a corner for the next round, and double crochet three times into the same corner.
  • Chain one and join with a slip stitch into the first double crochet like you did the previous round.

The rounds repeat like this and follow your typical granny square pattern so if you're still having trouble with it I recommend looking online on how to do a granny square. They're easy and forgiving to mistakes you may make.

Essentially you are adding one cluster of double crochet to each side with each round. Keep in mind this pattern makes a square, not a rectangle.

The overall pattern for the colors is as follows:

Round 1 - 2: Color A White
Round 3 - 6: Color B Navy
Round 7 - 8: Color C Pewter
Round 9 - 10: Color A White
Round 11 - 13: Color B Navy
Round 14 - 15: Color C Pewter
Etc...

This pattern continues and I did a total of 55 rows, but Paw Paw is a tall man so I wanted to make sure it covered him well. I  could use it as a blanket, but I'm short! The Red Heart pattern calls for 34 rounds which would be a nice sized lap blanket for someone like me.

It's an easy blanket to make and I know that Paw Paw will love having a Cowboy's themed blanket while he watches his football games and John Wayne movies in the comfort of his recliner.

Leave me comments if there are any questions or concerns!

Crochet Granny Square Lap Blanket in Dallas Cowboys Colors 

Saturday, June 28, 2014

Tomato Basil Soup with a Kick!


Another busy day of running errands and chores left me wanting to create something. My crochet hooks weren't inspiring me so I got to work in the kitchen to make a fun lunch.

Tomato basil soup with a grilled cheese sandwich in the background. I'll take credit for the soup, but the grilled cheese was all my husband!

I looked in my fridge to find some leftover evaporated milk from a Mac and Cheese recipe and then realized I have a can if tomato sauce AND fresh basil!  So my own version of tomato basil soup was born!

Husband's grilled cheese on whole wheat.

The husband added on a nice grilled cheese sandwich which was wonderful to dip into the soup.

The recipe is as follows:

Tomato Basil Soup with a Kick! 
Serves 4, Cook & Prep 30 minutes

1 can of tomato sauce
1 can of diced tomatoes
1 cup of evaporated milk (or substitute cream for a creamer version)
3 tablespoons of butter
A dozen large basil leafs
6 fresh oregano leafs
2 teaspoons red pepper flakes (leave out if you don't want it spicy)
2 teaspoon garlic powder (or one clove fresh)
1 teaspoon onion powder
Salt and pepper to taste

Directions:
In a sauce pan on th stove combine the tomato sauce, evaporated milk, butter and start to heat on medium-low heat while you prep everything else.
Open the can of diced tomatoes and drain the liquid out of them, a strainer might be nice to use. The diced tomatoes I tend to buy are large so I put the tomatoes on a cutting board and chopped them up finely. Next time I'll probably just use a food processor to get them finely chopped. I also tried to strain as much liquid out of them as I could because otherwise it'll make the soup more watery than creamy. At least that's my trick.
Next, I plucked about a dozen large basil leafs from our love basil plant on our kitchen table along with about 6 oregano leafs. Fresh basil really makes this soup shine so try to use fresh basil leafs if you can get them. The oregano on the other hand does not have to be fresh, I just happened to have some. If you use dried oregano I would just use about a teaspoon or so. 
Lastly, toss in the rest of the spices, red pepper flakes, garlic, and onion powder and then salt and paper to taste. 
Heat on medium high till slightly bubbly, then turn heat on low and cover. Let it simmer for about 20 minutes for the spices to blend.
Lastly, I topped the soup with a little bit of mozzarella cheese. Yummy!

Bubbly goodness!

For the grilled cheese we used whole wheat bread, sliced cheddar cheese and a bit of melted butter on the outside of the sandwich. He grilled it up old-school style and it was wonderful to dip into the soup! 


Easy to make and delicious lunch! Enjoy!


Thursday, June 12, 2014

Variation on Chunky Crocheted Basket

This week I took two tries at a new pattern: chunky crocheted basket!


My second attempt and I think it turned out very pretty and functional! 


I have always wanted to learn how to crochet a basket. I would always giggle seeing crocheted baskets on sale at Target or other home decor stores because I thought, "I could make something like that." Since I'm I between projects I found this cute pattern on (you guessed it!) Pinterest from Crochet in Color's blog.

Chunky Crochet Basket Pattern

http://crochetincolor.blogspot.ca/2012/02/chunky-crocheted-basket-pattern.html

I read the pattern and it called for the super bulky yarn I had just finished using on the afghan blanket I just finished (see previous post). Since I had some of the yarn left over I thought I'd give it a go. However, there were a few things this pattern called for that I didn't have: a size L or 8.00 mm hook. I had an N or 10.00mm and a K or 6.50mm hook. 

I also realized that I didn't have enough yarn because what the pattern asks you to do is to use two strands of the same color as once. 

If you have never used two strands of yarn at once it is really cool. You'll need a slightly bigger hook for it, but it yields results that give you a heathered look. The picture below is a shawl I started making I which I first used this technique. The yarn was red heart soft left over from a previous project and I used a K or 6.50mm hook.


Shawl I started making using two strands at once. A little tiresome for the hands, but pretty results. 


So I had some decisions to make since I didn't have enough yarn for two strands and I didn't have the right size hook. If you read in the pattern you need a smaller hook than the N (10.00mm) I had because the tighter stitch will give the basket the ability to hold shape and stand up stiffly. 

So what I concluded, I would use my super bulky yarn I had left over (Lion's Brand Thick and Quick) and use my K (6.50mm) hook since I was using only on strand. I didn't know if I'd have enough yarn to hold two and I didn't think a K hook could hold two super bulky yarns any way.

For my first try it turned out pretty good! It wasn't ask stiff which I concluded could be fixed with having multiple strands rather than the size of the hook. I rushed when I made the one above and added in a few stitches, but it still turned out pretty and functional.


My first go at it! I like the coloring of this basket too. This yarn is the super bulky lions brand thick and quick.


Since I gave the basket away, I was itching to try to pattern again, but this time I took a different approch. I didn't have enough of the super bulky yarn, so I picked up my cheap yarn.

I keep around a few skeins of cheap yarn like Caron's yarn by the pound. It's not the softest or the best colors, but I use it to practice new stitches or try out a little project. 

I picked up a dark red color, and a grey color I had along with my K (6.50mm) hook and started the pattern again.

Here is a link to the pattern: http://crochetincolor.blogspot.ca/2012/02/chunky-crocheted-basket-pattern.html
I do not want to copy and paste it because it is not my work. But I will share with you some of the changes I made.

What would soon be my new variation on the chunky basket.


For my basket (above) I went seven rounds for the base of the basket (one more than in the pattern) because I wanted a larger basket. Keep in mind, the larger the base of your basket, the longer it will take to make the side of the basket.

After round seven, follow the pattern (her round seven, my round eight).  I thought the way she described this round was interesting and I've interpreted it a few ways, but when I made these baskets I interpreted it as a back post stitch like I did in my previous afghan blanket. So that's what I did and it worked! 

I'm still not 100% certain that's what the pattern says, but it worked for me. I will caution you, that as you do this back post stitch and then start the next few rounds it doesn't look like a basket. It really isn't until you're about four rounds in that it takes shape so be patient. 

In the pattern she trades off with single crochets and half double crochets and works in the back loops (back post stitch). I didn't want to experiment with that yet so I just did a half double crochet all the way around. 

For the side of the basket I did twelve rounds before I made the handles. The handles in the pattern came out a bit smaller than I liked the first time I did the project so I made a few modifications again.

In the original pattern it says to chain 7 and skip 5 spaces. I chained 11 and skipped 9. I also had to do a little math because my basket is one round larger. So I took the number of stitches I had in a round (let's say 58), divided it by two giving you one side of your basket (58 divided by 2 is 29), then subtracted 9 (29 - 9 = 20) then divde that number by two (20 divided by 2 is 10). That's how many stitches I would do, then chain 11 skipping 9 spaces. 

So in the example above I would do 10 hdc, chain 11 skipping 9, hdc 20, chain 11, skip 9, hdc 10.

If I recall correctly my numbers didn't come out all the pretty, but it works more or less. I will probably always be making modifications and improving this pattern to my liking. 

The last thing I changed is in the original pattern she has you do another round after making the handles to make the handles more sturdy. I actually did another two rounds to make them extra sturdy and I think it turned out beautifully. 


I have to say I like the larger handles. 


Sorry if some of the pictures were dark, it's been rainy here, but I'm not complaining! Rainy days are the best days to crochet.

By the way, you may be asking, what do I do with this basket when I'm done? I keep it by my sofa and it's what the remotes and cell phones go into while we're watching a movie. I hate having to relocate cell phones and remotes during a movie at home - now they're all in one place!  

Leave me comments and questions! 

Monday, June 9, 2014

Chunky back post stitch masculine afghan blanket

Back in February I had a friend approach me about making an afghan blanket for her husband's birthday. She had seen some of the afghans I had made since I starting learning how to crochet.


The finished product!

She wanted a blanket in specific colors, orange and green, that had a chunky knit look to it. The back post stitch (directions below) allows for the top of a double crochet stitch to be pushed out giving it the appearance of a cable knit with it's raised ridge. After agreeing to a design it was time to get to work!

The raised stitch can be seen in this picture captured by my amazing husband! 

This is my first commissioned project! I was a little uncertain how to charge her because we're friends! I don't want to take money my friends especially when crocheting is a labor of love. So she agreed to buy the yarn since that tends to be the deciding factor on how pricey the projects gets.  And for those who do not crochet a project can go anywhere from $25 with the by-the-pound super cheap yarn to upwards $100 for nice acrylic yarn to $200 for wool blends or nicer non-acrylic yarn.

Regardless, a beautiful blanket is produced for an individual to use and love for years to come!

Here is the general pattern for this back post stitch (directions for this stitch below) afghan blanket.


Yarn: I used Lion Brand Wool Ese Thick and Quick in Barley (color A), Clinatro (color B), and Pumpkin (color C).
Hook: I used an N or 10.00mm, but you could use as small as a K or 6.50mm. I wouldn't use too small of a hook though because you have to work into the stitch in a unique way for the back post stitch do you don't want things too tight.
Level: beginner.
Time: took me about three months which is the average length of time it takes me to make an afghan blanket of this size.

Foundation chain: using color A there is really no need to count here, however, when doing the foundation chain either go up one hook size or make a loose chain. This is good advice whenever you're making a foundation chain because if they are too tight it can be impossible to works to for your first row. Make your foundation chain as wide as you want your blanket to be. I usually for about 4 feet to about 4.5 feet. 

After you have the desired width for your blanket measured out on your foundation chain, chain two more to turn and flip your work.

Row 1: double crochet in the third chain from the hook, and double crochet into each of the chains will you reach the last chain. Chain two for the turn and flip your work.

*note - normally you would chain three for the height of a double crochet, but because you will be working into the double crochet with the back post stitch it actually makes the double crochet shorter so you only need a height of a chain two. The double crochet is shorter because you are working a double crochet around the post of the double crochet in the row below which pushes the top of it out. Instead of working double crotchets to stack them on top of each other, you are layering the double crochets into each other.

Various Directions on how to do a back post double crochet stitch: 
FiberFlux Blog - http://www.fiberfluxblog.com/2014/04/how-to-work-back-post-double-crochet_3.html?utm_source=feedburner&utm_medium=email&utm_campaign=Feed:+blogspot/OeRXj+(Fiber+Flux...Adventures+in+Stitching)
(It's a front post, but you'll get the idea) ClassyCrochet Blog - http://classycrochet.wordpress.com/2013/01/08/how-to-front-post-double-crochet-fpdc/
Then there are numerous YouTube videos if you just search for the stitch.

Rows 2-10: with the same color you've been using for color A you will stitch do a double crochet back post stitch all the way across, doing a chain two to turn your work at the end of each row. The total of 10 rows will equal about 6 inches 

Rows 11-21: with color B do the same back post stitch for the next 10 rows.
Rows 22-32: with color A do the same back post stitch for the next 10 rows.
Rows 33-43: color C, same back post stitch for the next 10 rows.
Rows 44-54: color A, same back post stitch for the next 10 rows.
Rows 55-65: color B, same back post stitch for the next 10 rows. 
Rows 66-76: color A, same back post stitch for the next 10 rows. 
Rows 77-87: color C, same back post stitch for the next 10 rows.
Rows 88-98: color A, same back post stitch for the next 10 rows.
Rows 99-109: color B, same back post stitch for the next 10 rows.
Rows 110-120: color A, same back post stitch for the next 10 rows. 

That should give you about a five and a half foot blanket which is nice and snugly for one or two people.

Finishing: Before sewing in the tails where you joined yarn or changed colors throw the blanket in the wash on the cold water setting, then tumble dry on medium to low heat. Then sew in the tails.

My only warning with this blanket is that it is HEAVY! After about half way done with the project I could not transport it easily so it had to stay at home.

Here's how much yarn you will need 
Color A (in my case barley): about 15 skeins of yarn (although it might end up closer to 18 depending on how tight you crochet or if you expand your length/width).
Color B (in my case cilantro): about 9 skeins of yarn.
Color C (in my case pumpkin): about 6 skeins of yarn. 

To give you an idea of price the lion brand wool ease thick and quick is abut $5.26 a skein at Walmart.com. For the yarn totals above the project comes out to $173.58 before sales tax. Shocking right?! Thankfully my friend paid for a majority of the yarn and then we bartered for the rest (in true southern style she gave me yummy yummy deer meat!).


This project was fun and a unique challenge. It makes a very thick, chunky, heavy blanket for a cold winter night. I also liked this pattern because it looks masculine blanket which can be hard to pull off. Please leave me a comment if you have any questions!  Enjoy!

Monday, March 10, 2014

Modern Crocheted Blanket - Ripple Pattern

Latest creation!  The modern ripple blanket.


This past fall I learned that one of my coworkers got engaged and she happily started planning her wedding.  I, on the other hand, started planning on what her wedding afghan blanket would look like.  I remembered that for my wedding a dear relative of mine made a beautiful crocheted blanket - I still can't figure out how she did such beautiful stitching on it!  Here's a picture of my grant aunt Vera's crocheted blanket she gave me:


I'm still trying to figure out some of those stitches!

Back to my coworker's blanket.  I quizzed her on her wedding colors and got some perspective on her decor style.  I went for modern, although it may be more of a throw-back modern.  If there can be such a thing!

The first blanket I ever made was for my grandmother in-law and it ended up being a lap blanket because time was running out and making a huge blanket is expensive and heavy!  I was also losing stitches ... Truly some rookie mistakes and I wanted to learn from it. Here's what grandmother's ripple blanket looked liked:


The yarn used was the Red Heart Soft which was nice to work with, but it took many balls of yarn because they're smaller. 

Again, back to my coworker's blanket:  So I concluded that a modern look meant the ripples should be in bigger blocks and the colors fewer and simple.  I went with her turquoise color (as close as I could match) and black, but threw in the white because that is THE wedding color, right?  I was determined to make this one bigger and not lose stitches.  I succeeded!  The end result was a 4 foot by 5.5 foot blanket.  Great for a picnic, to snuggle up in or stay warm with the hubby.  Here is a picture of the result:


I have written out the basic pattern below.  Sometimes I forget to write out what I do so I have to remember so it's as close as I can get.

The over all ripple design was something I learned from the informative interwebs.  Here are the two resources I have used that are both video and picture:
Neat Ripple Pattern from Attic 24
I love her colorful designs and picture fantastic tutorials, but FYI her lingo and terms are UK, not US).

Crochet Crowd's How To Crochet Ripple Afghan aka Wave or Ripple
The crochet crowd makes awesome video tutorials.  It is so nice to pause, rewind, and hit play that matches my own speed and understanding.

 Here is my pattern along with amount of materials you will need.

Yarn:
Red Heart Supersaver White (4 skeins)
Red Heart Supersaver Real Teal (2 skeins)
Red Heart with Love Black (2 skeins)

The foundation chain can be tricky when doing the ripple because your length will change slightly so I make it a little longer than I think I might want but about half a foot or so.  It ended up being 4 ft wide.  From there I did 11 rows of the white color, and for the teal and black it ended up being about 11, but the white on either side it makes the color teal and black stripes appear a little smaller. 

The over all ripple pattern is double crochet with two sets of increases (two double crochets in one stitch) for the peak of the ripple, four double crochets for the slope, and two sets of decreases for the valley.  It's a pretty easy pattern and can be done quickly.  Enjoy!

Monday, March 3, 2014

Garlic Roasted Chicken and Fingerling Potatoes


Every Saturday morning my hubby and I wake up and begin the great discussion of "what do we cook for dinner tonight?"  We forgo the crowds and "scenes" that Saturday night restaurants seem to offer in favor of cooking a meal we want, the way we like it, and with each other's company.  And let's be honest, cooking in the kitchen can be very romantic!

So this Saturday the discussion began with my husband saying he wanted to cook a whole chicken.  It brought back memories of the first time my husband verbally delivered this proposition -- great idea! -- which is quickly followed by the memory of cutting into a half cooked chicken.  I think we ordered pizza that night.  It was a rookie mistake -- we were young and newly married with grand ideas in our head.

I have since learned that it is always best to have a solid game plan and recipes to fall back on incase things go poorly.  So we started with roasted chicken.  Great!  What else?  We soon found a recipe for baked chicken with garlic and shallots (http://www.finecooking.com/recipes/baked_chicken_herbs_and_shallots.aspx).

Baked Chicken with Herbs, Garlic & Shallots Recipe
Photo source: FineCooking.com
We have recently learned about cooking with shallots and the stinky process it can be!  My brave hubby will cry like a baby when cutting onions while I'm a pro -- the first time cutting up shallots about brought me to my knees!  The reason why onions make you cry is the bulb in the center which looks a lot like a shallot to me.  So if you want to avoid crying while cutting onions take out the bulb.  If you want to cut up shallots without crying -- be brave! 

In all seriousness you could probably substitute the shallots for one large while onion.  This recipe also calls for rosemary which we are not huge fans of so we left it out.

Instead we opted for a unique ingredient for our chicken - flavor infused olive oil.  As with most Saturdays we got out to run our errands and after having lunch ran upon this lovely store in Allen: Oil & Vinegar (http://oilandvinegarusa.com/).  We stopped in for inspiration and were not disappointed.  We left with a bottle of their extra virgin olive oil with Tuscan herbs which would be great to dip a nice French bread in, or, in our case, coat the outside of our chicken. 

Dallas, Texas

By coating the outside of our chicken with the olive oil, which you can use any type of olive oil you'd like as long as it goes with the flavor palate, the oil will crisp up the skin and keep things moist. 

To start we followed the recipe listed above with putting butter in a skillet to melt.  Once melted we added the diced shallots and gloves of garlic (don't chop up the garlic, but it does need to be peeled.  Once the shallots become tender it's ready to be added to the potatoes. 

So while the shallots and garlic are cooking in a skillet chop up some potatoes - quarter them.  We love to use fingerling potatoes - especially the ones that are a variety of color.  I find that fingerling potatoes, which are smaller than even red potatoes, have a lot of flavor and also cook quicker!  Looking for a quick cooking potato? Fingerling potatoes! 

Taking the thawed (make sure it's not frozen!) whole chicken you need to pat it dry with paper towels and take out the goodies inside (save them for chicken broth if you wish), and coat the chicken with olive oil and any seasons you'd like.  We threw on some Italian spices, salt, and pepper.  This can all be done on a cutting board while cooking shallots and garlic. 

Take your potatoes and arrange them on the bottom on your roasting pan - just make sure it's oven safe!  Once the potatoes are spread evenly in one layer on the bottom of your roasting pan take the shallot and garlic mixture and pour it over the potatoes.  Side note: if you want to season the potatoes in olive oil and other seasons go for it, but realize the shallot and garlic mixture will provide plenty of flavor! 

The chicken is ready to be roasted!


Now, take your prepared chicken and place it on top of the potatoes.  Make sure your oven is set to roast (or 350 degrees) and here is the formula for how long to roast the chicken: 20 minutes per pound plus 15.  In all honestly, we probably could have skipped the last 15 min in favor of a more juicy chicken -- this will need further testing!

So we put the chicken in and forget about it -- not really -- the smell is sooooo good!  You can't help but find yourself staring at it while it cooks!

Let's move onto a side dish we decided to throw with the chicken.

When the chicken was about 20 minutes away from being done we prepared the asparagus.  First chop off the bottoms and then steam them.  It really is an art to cook asparagus and the hubby gets better and better at it every time!


We have a special asparagus steamer we got as a wedding gift.  Wish we could say we use it for more items, but we really don't.  Just a veggie steamer will do to cook asparagus.

But I wanted something to flavor the asparagus -- and I found this sauce: Balsamic Glaze (http://allrecipes.com/recipe/balsamic-glaze/).  It is really simple and was my first go at it so I think there are some improvements to make.  It's a 1 to 0.25 ratio of balsamic vinegar (and I have a favorite one I use from Costco) to brown sugar.  My brown sugar is getting a little dry and needs replacing so I opted for the local honey we picked up at the grocery store the other weekend.  Same ratio.  Heat it till your sugary substances dissolves -- I probably should have let it cook down a bit more, but once my dear hubby set off the fire alarm with the fumes of the balsamic so we went easy.  Here's a picture of what it looked like cooking the glaze -- pretty!

Balsamic Glaze - psychedelic!
 
The glaze was a little more viscous (runny) that I'd like, but tasted so good with the veggies.  When every thing was done cooking, we cut up the chicken and plated all the goods.  Here's the final presentation:
 

The meal finally plated!
 
 
I have to say that every thing was good, but the potatoes took the cake!  I mean I'm an Irish girl and all, but the potatoes with the garlic and shallots were so savory!  The chicken was tender and very flavorful.  Our pups would not leave us alone the entire meal begging for table scraps.
 
What is great is with two people and whole chicken you have left overs and the options are endless on what to do with the chicken.  The next night, Sunday, we had some left over potatoes with it and just threw in a can of baked beans for a simple meal. 
 
Ideas of left over chicken: salad topper, sandwich meat, even slather it in BBQ sauce!  The flavor of the chicken allows for it to be reused easily into other dishes with slightly different flavors.
 
So here's the shopping list:
  • One whole chicken (as big or as small as you wish) -- thaw it!
  • A bag of fingerling potatoes (you'll want enough that when quartered will cover one layer of a roasting pan).
  • Two to three shallots -- we go easy on these because they are powerful.
  • Two to three garlic cloves -- although we tend to use more than that because we love garlic.
  • Olive oil of your choice (fancy or just Extra Virgin Olive Oil)
  • Italian seasoning or spices of your liking.
  • Butter
For the side dish of asparagus:
  • Fresh asparagus - the bigger in diameter the better.
  • Baslamic vinegar - Costco sells some that is my favorite, but any brand will do.
  • Honey or brown sugar.
This roasted chicken with garlic and potatoes looks easier than it sounds and is so delicious!  Give it a try and leave me comments or suggestions of how to improve it.  I'm always improve recipes.  Bon appetite y'all!
 
Garlic Roasted Chicken and fingerling  Potatoes
From the kitchen of Chateau de Savoy!


Sunday, February 23, 2014

Obligatory First Post

As with any project that has started, there must be an explanation or statement of purpose that is provided.  The intent for this blog is more selfish than anything.  I want a place where I can store my recipes, crochet projects, and other great ideas that I have done in and around my house.  

Often times my friends and family want to share in on my creations and discoveries, but my memory is not always the best.  And let's face it, I'm lazy when it comes to "getting back to people."  So why not write it down once, in a place that is easily shared by clicking a button rather than having to write down recipes, patterns, or explaining ideas for the one millionth time?  It's even pinnable to my new favorite and addictive app! 

This blog has a purpose of creative sharing and is a product of my desire for convenience.  It is my hope that the reader, you, benefit in some way from my cataloging of ideas from Chateau de Savoy!  Happy reading! 

Allison